The REST API Handbook – How to Build, Test, Consume, and Document REST APIs, by Germán Cocca

This is a copy of the article of Germán Cocca, published on www.freecodecamp.org

The following article is a copy of https://www.freecodecamp.org/news/build-consume-and-document-a-rest-api/, an article written by Germán Cocca.

I used it to learn the basis of API development with NodeJS.

I particularly like the folder structure and empahasis on the architecture.

Why a copy?

The original article doesn’t provide a table of contents accessible on the side like my blog.

Hi everyone! In this tutorial we’re going to take a deep dive into REST APIs.

I recently wrote this article where I explained the main differences between common API types nowadays. And this tutorial aims to show you an example of how you can fully implement a REST API.

We’ll cover basic setup and architecture with Node and Express, unit testing with Supertest, seeing how we can consume the API from a React front-end app and finally documenting the API using tools such as Swagger.

Keep in mind we won’t go too deep into how each technology works. The goal here is to give you a general overview of how a REST API works, how its pieces interact, and what a full implementation might consist of.

Let’s go!

What is REST?

Representational State Transfer (REST) is a widely used architectural style for building web services and APIs.

RESTful APIs are designed to be simple, scalable, and flexible. They are often used in web and mobile applications, as well as in Internet of Things (IoT) and microservices architectures.

**Main Characteristics:**

  1. **Stateless:** REST APIs are stateless, which means that each request contains all the necessary information to process it. This makes it easier to scale the API and improves performance by reducing the need to store and manage session data on the server.
  2. **Resource-based:** REST APIs are resource-based, which means that each resource is identified by a unique URI (Uniform Resource Identifier) and can be accessed using standard HTTP methods such as GET, POST, PUT, and DELETE.
  3. **Uniform Interface:** REST APIs have a uniform interface that allows clients to interact with resources using a standardized set of methods and response formats. This makes it easier for developers to build and maintain APIs, and for clients to consume them.
  4. **Cacheable:** REST APIs are cacheable, which means that responses can be cached to improve performance and reduce network traffic.
  5. **Layered System:** REST APIs are designed to be layered, which means that intermediaries such as proxies and gateways can be added between the client and server without affecting the overall system.

**Pros of REST APIs**:****

  • **Easy to learn and use:** REST APIs are relatively simple and easy to learn compared to other APIs.
  • **Scalability:** The stateless nature of REST APIs makes them highly scalable and efficient.
  • **Flexibility:** REST APIs are flexible and can be used to build a wide range of applications and systems.
  • **Wide support:** REST APIs are widely supported by development tools and frameworks, making it easy to integrate them into existing systems.

**Cons of REST APIs**:****

  • **Lack of standards:** The lack of strict standards for REST APIs can lead to inconsistencies and interoperability issues.
  • **Limited functionality:** REST APIs are designed to handle simple requests and responses and may not be suitable for more complex use cases.
  • **Security concerns:** REST APIs can be vulnerable to security attacks such as cross-site scripting (XSS) and cross-site request forgery (CSRF) if not implemented properly.

REST APIs are best for:****

  • REST APIs are well-suited for building web and mobile applications, as well as microservices architectures and IoT systems.
  • They are particularly useful in situations where scalability and flexibility are important, and where developers need to integrate with existing systems and technologies.

In summary, REST APIs are a popular and widely used architectural style for building web services and APIs. They are simple, scalable, and flexible, and can be used to build a wide range of applications and systems.

While there are some limitations and concerns with REST APIs, they remain a popular and effective option for building APIs in many different industries and sectors.

How to Build a REST API with Node and Express

Our tools

Node.js is an open-source, cross-platform, back-end JavaScript runtime environment that allows developers to execute JavaScript code outside of a web browser. It was created by Ryan Dahl in 2009 and has since become a popular choice for building web applications, APIs, and servers.

Node.js provides an event-driven, non-blocking I/O model that makes it lightweight and efficient, allowing it to handle large amounts of data with high performance. It also has a large and active community, with many libraries and modules available to help developers build their applications more quickly and easily.

Express.js is a popular web application framework for Node.js, which is used to build web applications and APIs. It provides a set of features and tools for building web servers, handling HTTP requests and responses, routing requests to specific handlers, handling middleware, and much more.

Express is known for its simplicity, flexibility, and scalability, making it a popular choice for developers building web applications with Node.js.

Some of the key features and benefits of Express.js include:

  • Minimalistic and flexible: Express.js provides a minimalistic and flexible structure that allows developers to build applications the way they want to.
  • Routing: Express.js makes it easy to define routes for handling HTTP requests and mapping them to specific functions or handlers.
  • Middleware: Express.js allows developers to define middleware functions that can be used to handle common tasks such as authentication, logging, error handling, and more.
  • Robust API: Express.js provides a robust API for handling HTTP requests and responses, allowing developers to build high-performance web applications.

Our architecture

For this project we’ll follow a layers architecture in our codebase. Layers architecture is about dividing concerns and responsibilities into different folders and files, and allowing direct communication only between certain folders and files.

The matter of how many layers should your project have, what names should each layer have, and what actions should it handle is all a matter of discussion. So let’s see what I think is a good approach for our example.

Our application will have five different layers, which will be ordered in this way:

Application layers

Application layers

  • The application layer will have the basic setup of our server and the connection to our routes (the next layer).
  • The routes layer will have the definition of all of our routes and the connection to the controllers (the next layer).
  • The controllers layer will have the actual logic we want to perform in each of our endpoints and the connection to the model layer (the next layer, you get the idea…)
  • The model layer will hold the logic for interacting with our mock database.
  • Finally, the persistence layer is where our database will be.

An important thing to keep in mind is that in these kinds of architectures, **there’s a defined communication flow** between the layers that has to be followed for it to make sense.

This means that a request first has to go through the first layer, then the second, then the third and so on. No request should skip layers because that would mess with the logic of the architecture and the benefits of organization and modularity it gives us.

If you’d like to know some other API architecture options, I recommend you this software architecture article I wrote a while ago.

The code for the API

Before jumping to the code, let’s mention what we’ll actually build. We’ll be building an API for a pet shelter business. This pet shelter needs to register the pets that are staying in the shelter, and for that we’ll perform basic CRUD operations (create, read, update and delete).

Now yeah, let’s get this thing going. Create a new directory, hop on to it and start a new Node project by running npm init -y.

Then install Express by running npm i express and install nodemon as a dev dependency by running npm i -D nodemon (Nodemon is a tool we’ll use to get our server running and test it). Lastly, also run npm i cors, which we’ll use to be able to test our server locally.

App.js

Cool, now create an app.js file and drop this code in it:

 1
 2
 3
 4
 5
 6
 7
 8
 9
10
11
12
13
14
15
16
17
18
19
20
21
22
23
import express from "express";
import cors from "cors";

import petRoutes from "./pets/routes/pets.routes.js";

const app = express();
const port = 3000;

/* Global middlewares */
app.use(cors());
app.use(express.json());

/* Routes */
app.use("/pets", petRoutes);

/* Server setup */
if (process.env.NODE_ENV !== "test") {
  app.listen(port, () =>
    console.log(`⚡️[server]: Server is running at https://localhost:${port}`)
  );
}

export default app;

This would be the application layer of our project.

Here we’re basically setting up our server and declaring that any request that hits the /pets direction should use the routes (endpoints) we have declared in the ./pets/routes/pets.routes.js directory.

Next, go ahead and create this folder structure in your project:
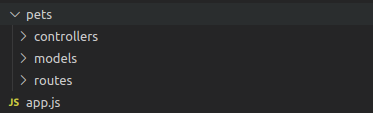
Folder structure

Routes

Hop on to the routes folder, create a file called pets.routes.js, and drop this code in it:

 1
 2
 3
 4
 5
 6
 7
 8
 9
10
11
12
13
14
15
16
17
18
19
20
21
22
import express from "express";
import {
  listPets,
  getPet,
  editPet,
  addPet,
  deletePet,
} from "../controllers/pets.controllers.js";

const router = express.Router();

router.get("/", listPets);

router.get("/:id", getPet);

router.put("/:id", editPet);

router.post("/", addPet);

router.delete("/:id", deletePet);

export default router;

In this file we’re initializing a router (the thing that processes our request and directs them accordingly given the endpoint URL) and setting up each of our endpoints.

See that for each endpoint we declare the corresponding HTTP method (get, put, and so on) and the corresponding function that that endpoint will trigger (listPets, getPet, and so on). Each function name is quite explicit so we can easily know what each endpoint does without needing to see further code. ;)

Lastly, we also declare which endpoint will receive URL parameters on the requests like this: router.get("/:id", getPet); Here we’re saying that we’ll receive the id of the pet as an URL parameter.

Controllers

Now go to the controllers folder, create a pets.controllers.js file, and put this code in it:

 1
 2
 3
 4
 5
 6
 7
 8
 9
10
11
12
13
14
15
16
17
18
19
20
21
22
23
24
25
26
27
28
29
30
31
32
33
34
35
36
37
38
39
40
41
42
43
44
45
46
47
48
49
50
51
52
import {
  getItem,
  listItems,
  editItem,
  addItem,
  deleteItem,
} from "../models/pets.models.js";

export const getPet = (req, res) => {
  try {
    const resp = getItem(parseInt(req.params.id));
    res.status(200).json(resp);
  } catch (err) {
    res.status(500).send(err);
  }
};

export const listPets = (req, res) => {
  try {
    const resp = listItems();
    res.status(200).json(resp);
  } catch (err) {
    res.status(500).send(err);
  }
};

export const editPet = (req, res) => {
  try {
    const resp = editItem(parseInt(req.params.id), req.body);
    res.status(200).json(resp);
  } catch (err) {
    res.status(500).send(err);
  }
};

export const addPet = (req, res) => {
  try {
    const resp = addItem(req.body);
    res.status(200).json(resp);
  } catch (err) {
    res.status(500).send(err);
  }
};

export const deletePet = (req, res) => {
  try {
    const resp = deleteItem(parseInt(req.params.id));
    res.status(200).json(resp);
  } catch (err) {
    res.status(500).send(err);
  }
};

Controllers are the functions that each endpoint request will trigger. As you can see, they receive as parameters the request and response objects. In the request object we can read things such as URL or body parameters, and we’ll use the response object to send our response after doing the corresponding computation.

Each controller calls a specific function defined in our models.

Models

Now go to the models folder and create a pets.models.js file with this code in it:

 1
 2
 3
 4
 5
 6
 7
 8
 9
10
11
12
13
14
15
16
17
18
19
20
21
22
23
24
25
26
27
28
29
30
31
32
33
34
35
36
37
38
39
40
41
42
43
44
45
46
47
48
49
50
51
52
53
54
55
import db from "../../db/db.js";

export const getItem = (id) => {
  try {
    const pet = db?.pets?.filter((pet) => pet?.id === id)[0];
    return pet;
  } catch (err) {
    console.log("Error", err);
  }
};

export const listItems = () => {
  try {
    return db?.pets;
  } catch (err) {
    console.log("Error", err);
  }
};

export const editItem = (id, data) => {
  try {
    const index = db.pets.findIndex((pet) => pet.id === id);

    if (index === -1) throw new Error("Pet not found");
    else {
      db.pets[index] = data;
      return db.pets[index];
    }
  } catch (err) {
    console.log("Error", err);
  }
};

export const addItem = (data) => {
  try {
    const newPet = { id: db.pets.length + 1, ...data };
    db.pets.push(newPet);
    return newPet;
  } catch (err) {
    console.log("Error", err);
  }
};

export const deleteItem = (id) => {
  try {
    // delete item from db
    const index = db.pets.findIndex((pet) => pet.id === id);

    if (index === -1) throw new Error("Pet not found");
    else {
      db.pets.splice(index, 1);
      return db.pets;
    }
  } catch (error) {}
};

These are the functions responsible for interacting with our data layer (database) and returning the corresponding information to our controllers.

Database

We wont use a real database for this example. Instead we’ll just use a simple array that will work just fine for example purposes, though our data will of course reset every time our server does.

In the root of our project, create a db folder and a db.js file with this code in it:

 1
 2
 3
 4
 5
 6
 7
 8
 9
10
11
12
13
14
15
16
17
18
19
20
21
22
23
24
25
26
27
const db = {
  pets: [
    {
      id: 1,
      name: "Rex",
      type: "dog",
      age: 3,
      breed: "labrador",
    },
    {
      id: 2,
      name: "Fido",
      type: "dog",
      age: 1,
      breed: "poodle",
    },
    {
      id: 3,
      name: "Mittens",
      type: "cat",
      age: 2,
      breed: "tabby",
    },
  ],
};

export default db;

As you can see, our db object contains a pets property whose value is an array of objects, each object being a pet. For each pet, we store an id, name, type, age and breed.

Now go to your terminal and run nodemon app.js. You should see this message confirming your server is alive: ⚡️[server]: Server is running at [https://localhost:3000](https://localhost:3000).

How to Test a REST API with Supertest

Now that our server is up and running, let’s implement a simple test suit to check if each of our endpoints behaves as expected.

If you’re not familiar with automated testing, I recommend you read this introductory article I wrote a while ago.

Our tools to test

SuperTest is a JavaScript library that is used for testing HTTP servers or web applications that make HTTP requests. It provides a high-level abstraction for testing HTTP, allowing developers to send HTTP requests and make assertions about the responses received, making it easier to write automated tests for web applications.

SuperTest works with any JavaScript testing framework, such as Mocha or Jest, and can be used with any HTTP server or web application framework, such as Express.

SuperTest is built on top of the popular testing library Mocha, and uses the Chai assertion library to make assertions about the responses received. It provides an easy-to-use API for making HTTP requests, including support for authentication, headers, and request bodies.

SuperTest also allows developers to test the entire request/response cycle, including middleware and error handling, making it a powerful tool for testing web applications.

Overall, SuperTest is a valuable tool for developers who want to write automated tests for their web applications. It helps ensure that their applications are functioning correctly and that any changes they make to the codebase do not introduce new bugs or issues.

The code to test

First we’ll need to install some dependencies. To save up terminal commands, go to your package.json file and replace your devDependencies section with this. Then run npm install

1
2
3
4
5
6
7
8
9
      "devDependencies": {
        "@babel/core": "^7.21.4",
        "@babel/preset-env": "^7.21.4",
        "babel-jest": "^29.5.0",
        "jest": "^29.5.0",
        "jest-babel": "^1.0.1",
        "nodemon": "^2.0.22",
        "supertest": "^6.3.3"
      }

Here we’re installing the supertest and jest libraries, which we need for our tests to run, plus some babel stuff we need for our project to correctly identify which files are test files.

Still in your package.json, add this script:

1
2
3
      "scripts": {
        "test": "jest"
      },

To end with the boilerplate, in the root of your project, create a babel.config.cjs file and drop this code in it:

 1
 2
 3
 4
 5
 6
 7
 8
 9
10
11
12
13
//babel.config.cjs
module.exports = {
  presets: [
    [
      "@babel/preset-env",
      {
        targets: {
          node: "current",
        },
      },
    ],
  ],
};

Now let’s write some actual tests! Within your routes folder, create a pets.test.js file with this code in it:

  1
  2
  3
  4
  5
  6
  7
  8
  9
 10
 11
 12
 13
 14
 15
 16
 17
 18
 19
 20
 21
 22
 23
 24
 25
 26
 27
 28
 29
 30
 31
 32
 33
 34
 35
 36
 37
 38
 39
 40
 41
 42
 43
 44
 45
 46
 47
 48
 49
 50
 51
 52
 53
 54
 55
 56
 57
 58
 59
 60
 61
 62
 63
 64
 65
 66
 67
 68
 69
 70
 71
 72
 73
 74
 75
 76
 77
 78
 79
 80
 81
 82
 83
 84
 85
 86
 87
 88
 89
 90
 91
 92
 93
 94
 95
 96
 97
 98
 99
100
101
102
103
104
105
106
107
108
109
110
111
112
113
114
115
116
117
118
119
120
121
import supertest from "supertest"; // Import supertest
import server from "../../app"; // Import the server object
const requestWithSupertest = supertest(server); // We will use this function to mock HTTP requests

describe('GET "/"', () => {
  test('GET "/" returns all pets', async () => {
    const res = await requestWithSupertest.get("/pets");
    expect(res.status).toEqual(200);
    expect(res.type).toEqual(expect.stringContaining("json"));
    expect(res.body).toEqual([
      {
        id: 1,
        name: "Rex",
        type: "dog",
        age: 3,
        breed: "labrador",
      },
      {
        id: 2,
        name: "Fido",
        type: "dog",
        age: 1,
        breed: "poodle",
      },
      {
        id: 3,
        name: "Mittens",
        type: "cat",
        age: 2,
        breed: "tabby",
      },
    ]);
  });
});

describe('GET "/:id"', () => {
  test('GET "/:id" returns given pet', async () => {
    const res = await requestWithSupertest.get("/pets/1");
    expect(res.status).toEqual(200);
    expect(res.type).toEqual(expect.stringContaining("json"));
    expect(res.body).toEqual({
      id: 1,
      name: "Rex",
      type: "dog",
      age: 3,
      breed: "labrador",
    });
  });
});

describe('PUT "/:id"', () => {
  test('PUT "/:id" updates pet and returns it', async () => {
    const res = await requestWithSupertest.put("/pets/1").send({
      id: 1,
      name: "Rexo",
      type: "dogo",
      age: 4,
      breed: "doberman",
    });
    expect(res.status).toEqual(200);
    expect(res.type).toEqual(expect.stringContaining("json"));
    expect(res.body).toEqual({
      id: 1,
      name: "Rexo",
      type: "dogo",
      age: 4,
      breed: "doberman",
    });
  });
});

describe('POST "/"', () => {
  test('POST "/" adds new pet and returns the added item', async () => {
    const res = await requestWithSupertest.post("/pets").send({
      name: "Salame",
      type: "cat",
      age: 6,
      breed: "pinky",
    });
    expect(res.status).toEqual(200);
    expect(res.type).toEqual(expect.stringContaining("json"));
    expect(res.body).toEqual({
      id: 4,
      name: "Salame",
      type: "cat",
      age: 6,
      breed: "pinky",
    });
  });
});

describe('DELETE "/:id"', () => {
  test('DELETE "/:id" deletes given pet and returns updated list', async () => {
    const res = await requestWithSupertest.delete("/pets/2");
    expect(res.status).toEqual(200);
    expect(res.type).toEqual(expect.stringContaining("json"));
    expect(res.body).toEqual([
      {
        id: 1,
        name: "Rexo",
        type: "dogo",
        age: 4,
        breed: "doberman",
      },
      {
        id: 3,
        name: "Mittens",
        type: "cat",
        age: 2,
        breed: "tabby",
      },
      {
        id: 4,
        name: "Salame",
        type: "cat",
        age: 6,
        breed: "pinky",
      },
    ]);
  });
});

For each endpoint, the tests send HTTP requests and check the responses for three things: the HTTP status code, the response type (which should be JSON), and the response body (which should match the expected JSON format).

  • The first test sends a GET request to the /pets endpoint and expects the API to return an array of pets in JSON format.
  • The second test sends a GET request to the /pets/:id endpoint and expects the API to return the pet with the specified ID in JSON format.
  • The third test sends a PUT request to the /pets/:id endpoint and expects the API to update the pet with the specified ID and return the updated pet in JSON format.
  • The fourth test sends a POST request to the /pets endpoint and expects the API to add a new pet and return the added pet in JSON format.
  • Finally, the fifth test sends a DELETE request to the /pets/:id endpoint and expects the API to remove the pet with the specified ID and return the updated list of pets in JSON format.

Each test checks whether the expected HTTP status code, response type, and response body are returned. If any of these expectations are not met, the test fails and provides an error message.

These tests are important for ensuring that the API is working correctly and consistently across different HTTP requests and endpoints. The tests can be run automatically, which makes it easy to detect any issues or regressions in the API’s functionality.

Now go to your terminal, run npm test, and you should see all your tests passing:

 1
 2
 3
 4
 5
 6
 7
 8
 9
10
11
12
13
14
15
16
17
18
19
20
    > restapi@1.0.0 test
    > jest

     PASS  pets/routes/pets.test.js
      GET "/"
        ✓ GET "/" returns all pets (25 ms)
      GET "/:id"
        ✓ GET "/:id" returns given pet (4 ms)
      PUT "/:id"
        ✓ PUT "/:id" updates pet and returns it (15 ms)
      POST "/"
        ✓ POST "/" adds new pet and returns the added item (3 ms)
      DELETE "/:id"
        ✓ DELETE "/:id" deletes given pet and returns updated list (3 ms)

    Test Suites: 1 passed, 1 total
    Tests:       5 passed, 5 total
    Snapshots:   0 total
    Time:        1.611 s
    Ran all test suites.

How to Consume a REST API on a Front-end React App

Now we know our server is running and our endpoints are behaving as expected. Let’s see some more realistic example of how our API might be consumed by a front end app.

For this example, we’ll use a React application, and two different tools to send and process our requests: the Fetch API and the Axios library.

Our frontend tools

React is a popular JavaScript library for building user interfaces. It allows developers to create reusable UI components and efficiently update and render them in response to changes in application state.

The Fetch API is a modern browser API that allows developers to make asynchronous HTTP requests from client-side JavaScript code. It provides a simple interface for fetching resources across the network, and supports a variety of request and response types.

Axios is a popular HTTP client library for JavaScript. It provides a simple and intuitive API for making HTTP requests, and supports a wide range of features, including request and response interception, automatic transforms for request and response data, and the ability to cancel requests. It can be used both in the browser and on the server, and is often used in conjunction with React applications.

The frontend code

Let’s create our React app by running yarn create vite and following the terminal prompts. Once that’s done, run yarn add axios and yarn add react-router-dom (which we’ll use to setup basic routing in our app).

App.jsx

Put this code within your App.jsx file:

 1
 2
 3
 4
 5
 6
 7
 8
 9
10
11
12
13
14
15
16
17
18
19
20
21
22
23
24
25
26
27
28
29
30
31
32
33
34
35
36
37
38
39
40
41
42
43
44
45
46
47
48
49
50
51
52
53
54
55
56
57
58
59
60
61
62
63
64
import { Suspense, lazy, useState } from "react";
import { BrowserRouter as Router, Routes, Route, Link } from "react-router-dom";
import "./App.css";

const PetList = lazy(() => import("./pages/PetList"));
const PetDetail = lazy(() => import("./pages/PetDetail"));
const EditPet = lazy(() => import("./pages/EditPet"));
const AddPet = lazy(() => import("./pages/AddPet"));

function App() {
  const [petToEdit, setPetToEdit] = useState(null);

  return (
    <div className="App">
      <Router>
        <h1>Pet shelter</h1>

        <Link to="/add">
          <button>Add new pet</button>
        </Link>

        <Routes>
          <Route
            path="/"
            element={
              <Suspense fallback={<></>}>
                <PetList />
              </Suspense>
            }
          />

          <Route
            path="/:petId"
            element={
              <Suspense fallback={<></>}>
                <PetDetail setPetToEdit={setPetToEdit} />
              </Suspense>
            }
          />

          <Route
            path="/:petId/edit"
            element={
              <Suspense fallback={<></>}>
                <EditPet petToEdit={petToEdit} />
              </Suspense>
            }
          />

          <Route
            path="/add"
            element={
              <Suspense fallback={<></>}>
                <AddPet />
              </Suspense>
            }
          />
        </Routes>
      </Router>
    </div>
  );
}

export default App;

Here we’re just defining our routes. We’ll have 4 main routes in our app, each corresponding to a different view:

  • One to see the whole list of pets.
  • One to see the detail of a single pet.
  • One to edit a single pet.
  • One to add a new pet to the list.

Besides, we have a button to add a new pet and a state that will store the information of the pet we want to edit.

Next, create a pages directory with these files in it:
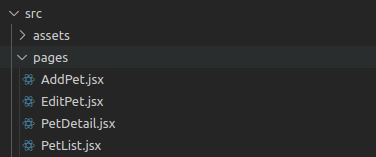
Folder structure

PetList.jsx

Let’s start with the file responsible for rendering the whole list of pets:

 1
 2
 3
 4
 5
 6
 7
 8
 9
10
11
12
13
14
15
16
17
18
19
20
21
22
23
24
25
26
27
28
29
30
31
32
33
34
35
36
37
38
39
40
41
42
43
44
45
46
47
48
import { useEffect, useState } from "react";
import { Link } from "react-router-dom";
import axios from "axios";

function PetList() {
  const [pets, setPets] = useState([]);

  const getPets = async () => {
    try {
      /* FETCH */
      // const response = await fetch('http://localhost:3000/pets')
      // const data = await response.json()
      // if (response.status === 200) setPets(data)

      /* AXIOS */
      const response = await axios.get("http://localhost:3000/pets");
      if (response.status === 200) setPets(response.data);
    } catch (error) {
      console.error("error", error);
    }
  };

  useEffect(() => {
    getPets();
  }, []);

  return (
    <>
      <h2>Pet List</h2>

      {pets?.map((pet) => {
        return (
          <div key={pet?.id}>
            <p>
              {pet?.name} - {pet?.type} - {pet?.breed}
            </p>

            <Link to={`/${pet?.id}`}>
              <button>Pet detail</button>
            </Link>
          </div>
        );
      })}
    </>
  );
}

export default PetList;

As you can see, logic-wise we have 3 main things here:

  • A state that stores the list of pets to render.
  • A function that executes the corresponding request to our API.
  • A useEffect that executes that function when the component renders.

You can see that the syntax for making the HTTP request with fetch and Axios is rather similar, but Axios is a tiny bit more succinct. Once we make the request, we check if the status is 200 (meaning it was successful), and store the response in our state.

Once our state is updated, the component will render the data provided by our API.

Remember that to make calls to our server, we must have it up and running by running nodemon app.js in our server project terminal.

PetDetail.jsx

Now let’s go to the PetDetail.jsx file:

 1
 2
 3
 4
 5
 6
 7
 8
 9
10
11
12
13
14
15
16
17
18
19
20
21
22
23
24
25
26
27
28
29
30
31
32
33
34
35
36
37
38
39
40
41
42
43
44
45
46
47
48
49
50
51
52
53
54
55
56
57
58
59
60
61
62
63
64
65
66
67
68
69
70
71
72
73
74
75
76
77
78
79
80
81
82
83
84
85
86
87
88
89
90
91
92
import { useEffect, useState } from "react";
import { useParams, Link } from "react-router-dom";
import axios from "axios";

function PetDetail({ setPetToEdit }) {
  const [pet, setPet] = useState([]);

  const { petId } = useParams();

  const getPet = async () => {
    try {
      /* FETCH */
      // const response = await fetch(`http://localhost:3000/pets/${petId}`)
      // const data = await response.json()
      // if (response.status === 200) {
      //     setPet(data)
      //     setPetToEdit(data)
      // }

      /* AXIOS */
      const response = await axios.get(`http://localhost:3000/pets/${petId}`);
      if (response.status === 200) {
        setPet(response.data);
        setPetToEdit(response.data);
      }
    } catch (error) {
      console.error("error", error);
    }
  };

  useEffect(() => {
    getPet();
  }, []);

  const deletePet = async () => {
    try {
      /* FETCH */
      // const response = await fetch(`http://localhost:3000/pets/${petId}`, {
      //     method: 'DELETE'
      // })

      /* AXIOS */
      const response = await axios.delete(
        `http://localhost:3000/pets/${petId}`
      );

      if (response.status === 200) window.location.href = "/";
    } catch (error) {
      console.error("error", error);
    }
  };

  return (
    <div
      style={{
        display: "flex",
        flexDirection: "column",
        justifyContent: "center",
        aligniItems: "center",
      }}
    >
      <h2>Pet Detail</h2>

      {pet && (
        <>
          <p>Pet name: {pet.name}</p>
          <p>Pet type: {pet.type}</p>
          <p>Pet age: {pet.age}</p>
          <p>Pet breed: {pet.breed}</p>

          <div
            style={{
              display: "flex",
              justifyContent: "center",
              aligniItems: "center",
            }}
          >
            <Link to={`/${pet?.id}/edit`}>
              <button style={{ marginRight: 10 }}>Edit pet</button>
            </Link>

            <button style={{ marginLeft: 10 }} onClick={() => deletePet()}>
              Delete pet
            </button>
          </div>
        </>
      )}
    </div>
  );
}

export default PetDetail;

Here we have two different kind of requests:

  • One that gets the information of the given pet (which behaves very similar to the previous request we saw). The only difference here is we’re passing an URL parameter to our endpoint, which at the same time we’re reading from the URL in our front-end app.
  • The other request is to delete the given pet from our register. The difference here is once we confirm that the request was successful, we redirect the user to the root of our app.

AddPet.jsx

This is the file responsible for adding a new pet to our register:

  1
  2
  3
  4
  5
  6
  7
  8
  9
 10
 11
 12
 13
 14
 15
 16
 17
 18
 19
 20
 21
 22
 23
 24
 25
 26
 27
 28
 29
 30
 31
 32
 33
 34
 35
 36
 37
 38
 39
 40
 41
 42
 43
 44
 45
 46
 47
 48
 49
 50
 51
 52
 53
 54
 55
 56
 57
 58
 59
 60
 61
 62
 63
 64
 65
 66
 67
 68
 69
 70
 71
 72
 73
 74
 75
 76
 77
 78
 79
 80
 81
 82
 83
 84
 85
 86
 87
 88
 89
 90
 91
 92
 93
 94
 95
 96
 97
 98
 99
100
101
import React, { useState } from "react";
import axios from "axios";

function AddPet() {
  const [petName, setPetName] = useState();
  const [petType, setPetType] = useState();
  const [petAge, setPetAge] = useState();
  const [petBreed, setPetBreed] = useState();

  const addPet = async () => {
    try {
      const petData = {
        name: petName,
        type: petType,
        age: petAge,
        breed: petBreed,
      };

      /* FETCH */
      // const response = await fetch('http://localhost:3000/pets/', {
      //     method: 'POST',
      //     headers: {
      //         'Content-Type': 'application/json'
      //     },
      //     body: JSON.stringify(petData)
      // })

      // if (response.status === 200) {
      //     const data = await response.json()
      //     window.location.href = `/${data.id}`
      // }

      /* AXIOS */
      const response = await axios.post(
        "http://localhost:3000/pets/",
        petData,
        { headers: { "Content-Type": "application/json" } }
      );

      if (response.status === 200)
        window.location.href = `/${response.data.id}`;
    } catch (error) {
      console.error("error", error);
    }
  };

  return (
    <div
      style={{
        display: "flex",
        flexDirection: "column",
        justifyContent: "center",
        aligniItems: "center",
      }}
    >
      <h2>Add Pet</h2>

      <div style={{ display: "flex", flexDirection: "column", margin: 20 }}>
        <label>Pet name</label>
        <input
          type="text"
          value={petName}
          onChange={(e) => setPetName(e.target.value)}
        />
      </div>

      <div style={{ display: "flex", flexDirection: "column", margin: 20 }}>
        <label>Pet type</label>
        <input
          type="text"
          value={petType}
          onChange={(e) => setPetType(e.target.value)}
        />
      </div>

      <div style={{ display: "flex", flexDirection: "column", margin: 20 }}>
        <label>Pet age</label>
        <input
          type="text"
          value={petAge}
          onChange={(e) => setPetAge(e.target.value)}
        />
      </div>

      <div style={{ display: "flex", flexDirection: "column", margin: 20 }}>
        <label>Pet breed</label>
        <input
          type="text"
          value={petBreed}
          onChange={(e) => setPetBreed(e.target.value)}
        />
      </div>

      <button style={{ marginTop: 30 }} onClick={() => addPet()}>
        Add pet
      </button>
    </div>
  );
}

export default AddPet;

Here we’re rendering a form in which the user has to enter the new pet info.

We have a state for each piece of information to enter, and in our request we build an object with each state. This object will be the body of our request.

On our request, we check if the response is successful. If it is, we redirect to the detail page of the newly added pet. To redirect, we use the id returned in the HTTP response. ;)

EditPet.jsx

Finally, the file responsible for editing a pet register:

 1
 2
 3
 4
 5
 6
 7
 8
 9
10
11
12
13
14
15
16
17
18
19
20
21
22
23
24
25
26
27
28
29
30
31
32
33
34
35
36
37
38
39
40
41
42
43
44
45
46
47
48
49
50
51
52
53
54
55
56
57
58
59
60
61
62
63
64
65
66
67
68
69
70
71
72
73
74
75
76
77
78
79
80
81
82
83
84
85
86
87
88
89
90
91
92
93
94
95
96
97
98
import React, { useState } from "react";
import axios from "axios";

function EditPet({ petToEdit }) {
  const [petName, setPetName] = useState(petToEdit?.name);
  const [petType, setPetType] = useState(petToEdit?.type);
  const [petAge, setPetAge] = useState(petToEdit?.age);
  const [petBreed, setPetBreed] = useState(petToEdit?.breed);

  const editPet = async () => {
    try {
      const petData = {
        id: petToEdit.id,
        name: petName,
        type: petType,
        age: petAge,
        breed: petBreed,
      };

      /* FETCH */
      // const response = await fetch(`http://localhost:3000/pets/${petToEdit.id}`, {
      //     method: 'PUT',
      //     headers: {
      //         'Content-Type': 'application/json'
      //     },
      //     body: JSON.stringify(petData)
      // })

      /* AXIOS */
      const response = await axios.put(
        `http://localhost:3000/pets/${petToEdit.id}`,
        petData,
        { headers: { "Content-Type": "application/json" } }
      );

      if (response.status === 200) {
        window.location.href = `/${petToEdit.id}`;
      }
    } catch (error) {
      console.error("error", error);
    }
  };

  return (
    <div
      style={{
        display: "flex",
        flexDirection: "column",
        justifyContent: "center",
        aligniItems: "center",
      }}
    >
      <h2>Edit Pet</h2>

      <div style={{ display: "flex", flexDirection: "column", margin: 20 }}>
        <label>Pet name</label>
        <input
          type="text"
          value={petName}
          onChange={(e) => setPetName(e.target.value)}
        />
      </div>

      <div style={{ display: "flex", flexDirection: "column", margin: 20 }}>
        <label>Pet type</label>
        <input
          type="text"
          value={petType}
          onChange={(e) => setPetType(e.target.value)}
        />
      </div>

      <div style={{ display: "flex", flexDirection: "column", margin: 20 }}>
        <label>Pet age</label>
        <input
          type="text"
          value={petAge}
          onChange={(e) => setPetAge(e.target.value)}
        />
      </div>

      <div style={{ display: "flex", flexDirection: "column", margin: 20 }}>
        <label>Pet breed</label>
        <input
          type="text"
          value={petBreed}
          onChange={(e) => setPetBreed(e.target.value)}
        />
      </div>

      <button style={{ marginTop: 30 }} onClick={() => editPet()}>
        Save changes
      </button>
    </div>
  );
}

export default EditPet;

This behaves very similar to the AddPet.jsx file. The only difference is that our pet info states are initialized with the values of the pet we want to edit. When those values are updated by the user, we construct an object that will be our request body and send the request with the updated information. Quite straightforward. ;)

And that’s it! We’re using all of our API endpoints in our front end app. =)

How to Document a REST API with Swagger

Now that we have our server up and running, tested, and connected to our front end app, the last step in our implementation will be to document our API.

Documenting and API generally means declaring which endpoints are available, what actions are performed by each endpoint, and the parameters and return values for each of them.

This is useful not only to remember how our server works, but also for people who want to interact with our API.

For example, in companies it’s very usual to have back-end teams and front-end teams. When an API is being developed and needs to be integrated with a front-end app, it would be very tedious to ask which endpoint does what, and what parameters should be passed. If you have all that info in a singe place, you can just go there and read it yourself. That’s what documentation is.

Our tools for Swagger

Swagger is a set of open-source tools that help developers build, document, and consume RESTful web services. It provides a user-friendly graphical interface for users to interact with an API and also generates client code for various programming languages to make API integration easier.

Swagger provides a comprehensive set of features for API development, including API design, documentation, testing, and code generation. It allows developers to define API endpoints, input parameters, expected output, and authentication requirements in a standardized way using the OpenAPI specification.

Swagger UI is a popular tool that renders OpenAPI specifications as an interactive API documentation that allows developers to explore and test APIs through a web browser. It provides a user-friendly interface that allows developers to easily view and interact with API endpoints.

How to Implement Swagger

Back in our server app, to implement Swagger we’ll need two new dependencies. So run npm i swagger-jsdoc and npm i swagger-ui-express.

Next, modify the app.js file to look like this:

 1
 2
 3
 4
 5
 6
 7
 8
 9
10
11
12
13
14
15
16
17
18
19
20
21
22
23
24
25
26
27
28
29
30
31
32
33
34
35
36
37
38
39
40
41
42
43
44
45
46
47
import express from "express";
import cors from "cors";
import swaggerUI from "swagger-ui-express";
import swaggerJSdoc from "swagger-jsdoc";

import petRoutes from "./pets/routes/pets.routes.js";

const app = express();
const port = 3000;

// swagger definition
const swaggerSpec = {
  definition: {
    openapi: "3.0.0",
    info: {
      title: "Pets API",
      version: "1.0.0",
    },
    servers: [
      {
        url: `http://localhost:${port}`,
      },
    ],
  },
  apis: ["./pets/routes/*.js"],
};

/* Global middlewares */
app.use(cors());
app.use(express.json());
app.use(
  "/api-docs",
  swaggerUI.serve,
  swaggerUI.setup(swaggerJSdoc(swaggerSpec))
);

/* Routes */
app.use("/pets", petRoutes);

/* Server setup */
if (process.env.NODE_ENV !== "test") {
  app.listen(port, () =>
    console.log(`⚡️[server]: Server is running at https://localhost:${port}`)
  );
}

export default app;

As you can see, we’re importing the new dependencies, we’re creating a swaggerSpec object that contains config options for our implementation, and then setting a middleware to render our documentation in the /api-docs directory of our app.

By now, if you open your browser and go to http://localhost:3000/api-docs/ you should see this:

Documentation UI

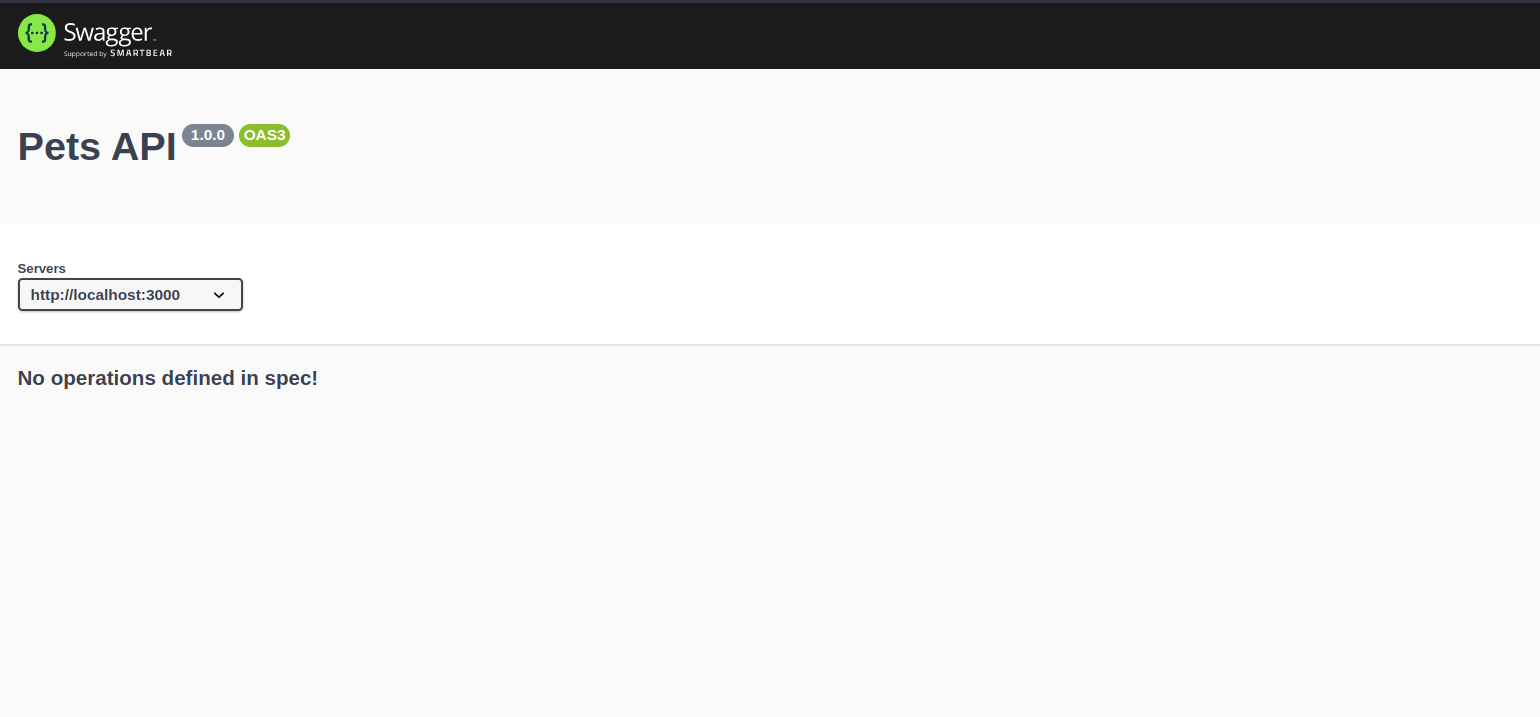
The cool thing about Swagger is it provides an out-of-the-box UI for our docs, and you can easily access it in the URL path declared in the config.

Now let’s write some actual documentation!

Hop on to the pets.routes.js file and replace its code with this:

  1
  2
  3
  4
  5
  6
  7
  8
  9
 10
 11
 12
 13
 14
 15
 16
 17
 18
 19
 20
 21
 22
 23
 24
 25
 26
 27
 28
 29
 30
 31
 32
 33
 34
 35
 36
 37
 38
 39
 40
 41
 42
 43
 44
 45
 46
 47
 48
 49
 50
 51
 52
 53
 54
 55
 56
 57
 58
 59
 60
 61
 62
 63
 64
 65
 66
 67
 68
 69
 70
 71
 72
 73
 74
 75
 76
 77
 78
 79
 80
 81
 82
 83
 84
 85
 86
 87
 88
 89
 90
 91
 92
 93
 94
 95
 96
 97
 98
 99
100
101
102
103
104
105
106
107
108
109
110
111
112
113
114
115
116
117
118
119
120
121
122
123
124
125
126
127
128
129
130
131
132
133
134
135
136
137
138
139
140
141
142
143
144
145
146
147
148
149
150
151
152
153
154
155
156
import express from "express";
import {
  listPets,
  getPet,
  editPet,
  addPet,
  deletePet,
} from "../controllers/pets.controllers.js";

const router = express.Router();

/**
 * @swagger
 * components:
 *  schemas:
 *     Pet:
 *      type: object
 *      properties:
 *          id:
 *              type: integer
 *              description: Pet id
 *          name:
 *              type: string
 *              description: Pet name
 *          age:
 *              type: integer
 *              description: Pet age
 *          type:
 *              type: string
 *              description: Pet type
 *          breed:
 *              type: string
 *              description: Pet breed
 *     example:
 *          id: 1
 *          name: Rexaurus
 *          age: 3
 *          breed: labrador
 *          type: dog
 */

/**
 * @swagger
 * /pets:
 *  get:
 *     summary: Get all pets
 *     description: Get all pets
 *     responses:
 *      200:
 *         description: Success
 *      500:
 *         description: Internal Server Error
 */
router.get("/", listPets);

/**
 * @swagger
 * /pets/{id}:
 *  get:
 *     summary: Get pet detail
 *     description: Get pet detail
 *     parameters:
 *       - in: path
 *         name: id
 *         schema:
 *           type: integer
 *         required: true
 *         description: Pet id
 *     responses:
 *      200:
 *         description: Success
 *      500:
 *         description: Internal Server Error
 */
router.get("/:id", getPet);

/**
 * @swagger
 * /pets/{id}:
 *  put:
 *     summary: Edit pet
 *     description: Edit pet
 *     parameters:
 *       - in: path
 *         name: id
 *         schema:
 *           type: integer
 *         required: true
 *         description: Pet id
 *     requestBody:
 *       description: A JSON object containing pet information
 *       content:
 *         application/json:
 *           schema:
 *              $ref: '#/components/schemas/Pet'
 *           example:
 *              name: Rexaurus
 *              age: 12
 *              breed: labrador
 *              type: dog
 *     responses:
 *     200:
 *        description: Success
 *     500:
 *       description: Internal Server Error
 *
 */
router.put("/:id", editPet);

/**
 * @swagger
 * /pets:
 *  post:
 *      summary: Add pet
 *      description: Add pet
 *      requestBody:
 *          description: A JSON object containing pet information
 *          content:
 *             application/json:
 *                 schema:
 *                    $ref: '#/components/schemas/Pet'
 *                 example:
 *                    name: Rexaurus
 *                    age: 12
 *                    breed: labrador
 *                    type: dog
 *      responses:
 *      200:
 *          description: Success
 *      500:
 *          description: Internal Server Error
 */
router.post("/", addPet);

/**
 * @swagger
 * /pets/{id}:
 *  delete:
 *     summary: Delete pet
 *     description: Delete pet
 *     parameters:
 *       - in: path
 *         name: id
 *         schema:
 *           type: integer
 *         required: true
 *         description: Pet id
 *     responses:
 *     200:
 *        description: Success
 *     500:
 *       description: Internal Server Error
 */
router.delete("/:id", deletePet);

export default router;

As you can see, we’re adding a special kind of comment for each of our endpoints. This is the way Swagger UI identifies the documentation within our code. We’ve put them in this file since it makes sense to have the docs as close to the endpoints as possible, but you could place them wherever you want.

If we analyze the comments in detail you could see they’re written in a YAML like syntax, and for each of them we specify the endpoint route, HTTP method, a description, the parameters it receives and the possible responses.

All comments are more or less the same except the first one. In that one we’re defining a “schema” which is like a typing to a kind of object we can later on reuse in other comments. In our case, we’re defining the “Pet” schema which we then use for the put and post endpoints.

If you enter http://localhost:3000/api-docs/ again, you should now see this:

Documentation UI

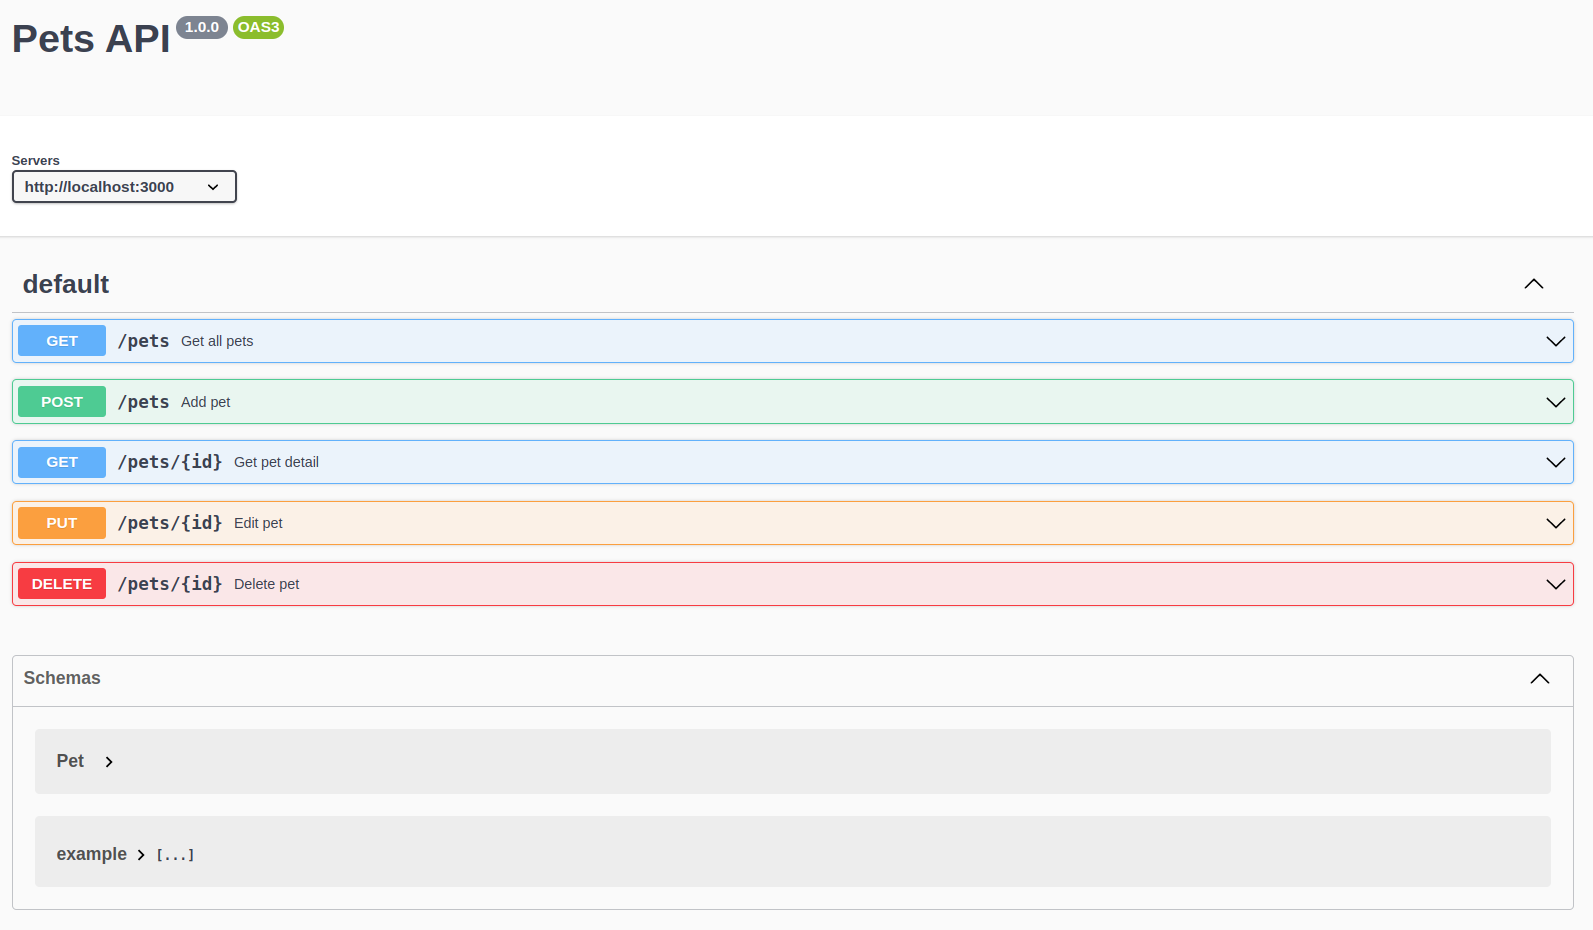
Each of the endpoints can be expanded, like this:

Documentation UI

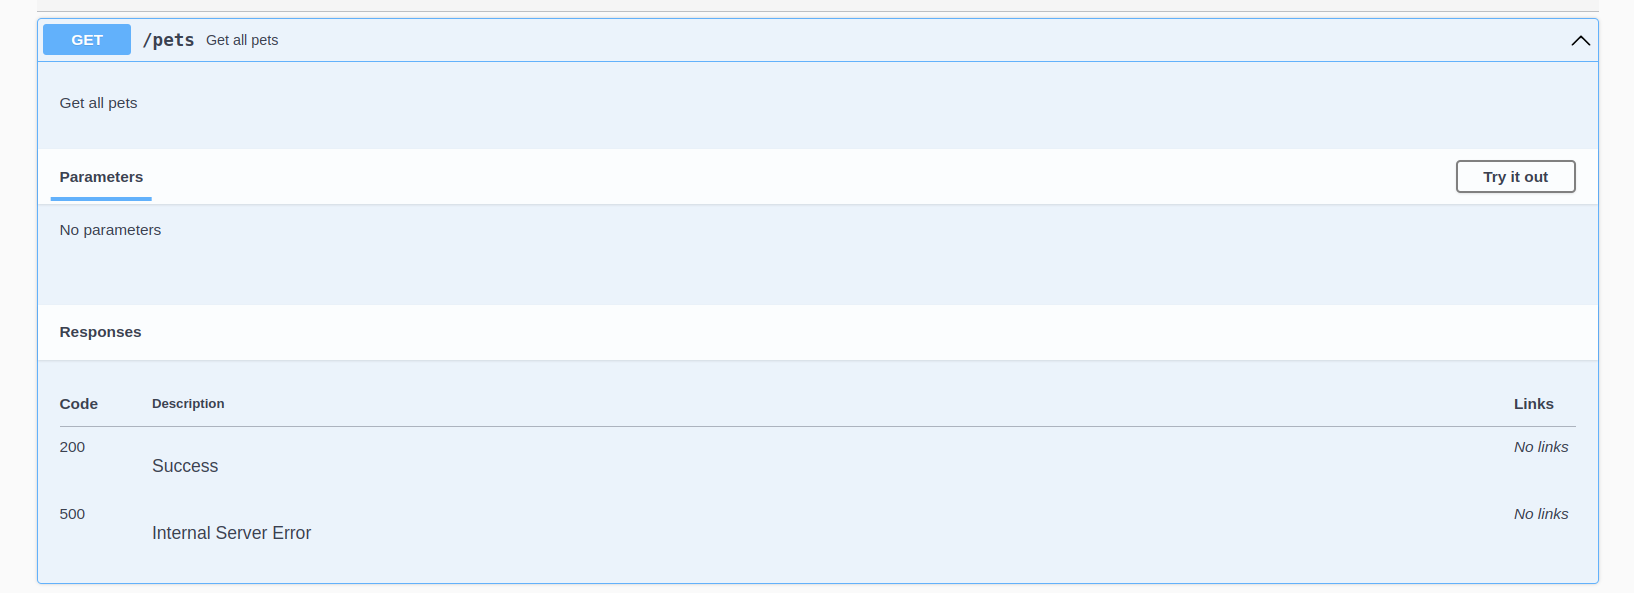
And if we click the “Try it out” button, we can execute an HTTP request and see what the response looks like:

Documentation UI

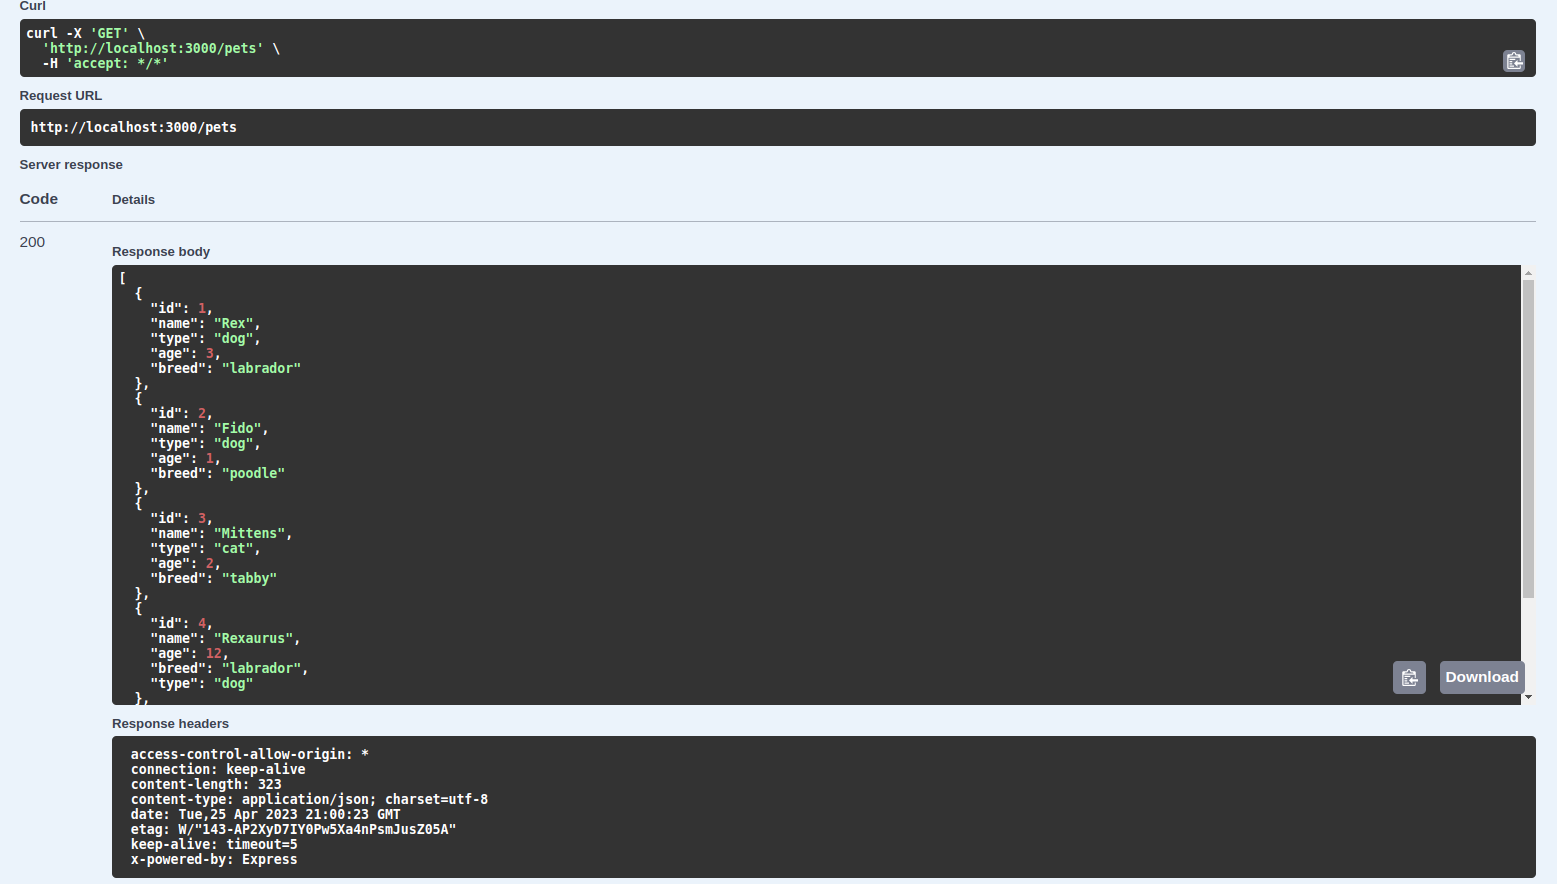
This is really useful for developers in general and people who want to work with our API, and very easy to set up as you can see.

Having an out-of-the-box UI simplifies the interaction with the documentation. And having it within our codebase as well is a great bonus, as we can modify and update it without the need of touching anything else but our own code.

Wrapping Up

As always, I hope you enjoyed the handbook and learned something new. If you want, you can also follow me on LinkedIn or Twitter.

See you in the next one!

Learn to code for free.

freeCodeCamp’s open source curriculum has helped more than 40,000 people get jobs as developers. Get started

License GPLv3 | Terms
Built with Hugo
Theme Stack designed by Jimmy