
For a few months now, I wanted to start using AI at another level. I’ve been using AI chatbots, mainly Claude.ai for more than 2 years, and I felt it was limiting.
I had an application idea for improving the time spent sharing blog posts, like this one, on social media.
I also wanted to learn how to use agentic coding through specification-driven development for the purpose of staying up to date with what I could be asked in my work in the near future.
Indeed, AI might not replace me, but the way we build things will and it will involve more and more AI, especially through agents, autonomous or not.
So I started by giving Claude.ai chatbot my idea and requested:
|
|
It gave me this initial plan:
|
|
Building the Specifications, ADR and Task List
I followed up with:
|
|
Still using Claude.ai for now, because I needed to grasp the logic above, I followed step-by-step the creation of each file, challenging and adjusting the content and the organization of the files.
As I progressed in the building of the application, I made sure Claude would follow the development workflow and suggest a new ADR at the appropriate moment. I also adjusted the system and workspace prompts when I saw a gap that needed to be recorded in its memory.
This commit shows you what the docs folder looked like when I was ready to launch the coding phase. For this point, I simply needed to set up Claude and get it started.
Install Claude Code Usage Extension
At first, knowing the cost of using Claude Code seemed key to me to keep spending under control.
In fact, I decided to try Claude Code through API credits at first simply because I wanted to confirm with actual metrics from my usage and confirm that the API credits method wasn’t cost-efficient.
Following this post from Atsushi Suzuki, I downloaded and installed the code to add a Visual Studio Code extension to count the cost of using Claude.
The setup explained in the article is sufficient. However, as we’ll see further down, accuracy isn’t great.
Install Claude Code
I used the official documentation. Using the Windows PowerShell option, I installed Claude Code application.
I also needed to add the C:\Users\[your_username]\.local\bin path to my PATH environment variable, as prompted at the end of the install.
I finished with a restart.
First Login in Visual Studio Code
I wanted to use the Claude Code official extension, but for some reason, I couldn’t stay logged in. It seemed to log me in successfully, since I got redirected to https://platform.claude.com, but as soon as I would type “Claude, are you ready”, the extension would tell me to login again…
So I decided to use the built-in terminal of VSCode and run claude command.
Before that, I needed to add the environment variable, since I’m using a custom Git installation with scoop.sh.
|
|
After another restart, I was finally ready…
Init CLAUDE.md
If you have a good starting point succinctly describing your project in a README file like I did, it will generate a CLAUDE.md that has the most important information about the project to build.
As always, make sure to read all what Claude Code generated for you and make sure it fits you.
For example, I added myself:
|
|
On the initialization, this is when Claude looks at files in your project. For example, I was using the Vue and Supabase Boilerplate I built myself and I gave Claude extra information about the template and what I need to keep or remove.
Completing First Task With Claude Code
This was the moment I was looking forward to. I began with the task **TR-1: Codebase Cleanup** Claude Code planned in the requirements file to make sure the leftover code from the Vue and Supabase template I used didn’t clutter the context of Claude Code.
It used 457,657 input tokens and 8,698 output tokens worth $1.08 (source: https://platform.claude.com/usage) to complete the task.
But the extension supposed to calculate the cost was quite off…
|
|
So instead, I try the CLI ccusage by running the install command:
|
|
Then running ccusage, I had something more consistent with the Claude Console usage.
|
|
Still, it’s off by more than 30%, but it’s definitely closer to the Claude Console statistics than the extension.
After tasks 2 to 8, I reached $13.80 while ccusage CLI told me I spent $10.44, making a 32% difference. I’ll likely report this to ccusage team.
But after reading a few issues on the repository, I can sense that calculating an accurate figure is very tricky and Anthropic can change rules without anyone really knowing when and how exactly.
Moving On to the Task Execution
I thought that the workflow Claude.ai suggested to me wasn’t ideal. I needed to create a file per task and write down the task myself.
But what if I could simply let Claude Code figure out the tasks from the requirements, ask me to review the plan it’d follow and then lunch it to complete the task? Remember: I was getting started with Claude and I didn’t know about the plan mode yet…
For that, I needed to give the workflow to follow in the system prompt file. I added to the system prompt that Claude Code should follow the Git Flow approach and create tasks itself.
As I progress with the implementation,
- I reviewed the code and the logic was implemented.
- I suggested adding tests to the project before Claude would code anything, creating a new ADR with the framework I preferred.
- I suggested improvements to the system prompt along the way, making sure Claude would really follow Git Flow (which it didn’t at first) when creating branches and making commits. You have to be specific and not assume that the AI knows everything.
- I left to myself the branch push and PR review.
- Once, after adding tests for the Vue Components, I noticed an issue that Claude didn’t see. You definitely need to review the output of tests, even if they pass. In that case, the component testing was failing on
fetchcalls, which didn’t impact the actual test results, but polluted the output in the GitHub action.
Claude Isn’t Always Correct
Yes, that’s what the small prints tell you when you launch Claude Code or use any chatbot.
It told me that a SPA would be fine and there would be no CORS issue to fetch HTML content from the provided URL, which we serve on a different domain.
I knew it wouldn’t work, but I went ahead to see if Claude would notice. It did add tests for the CORS issue, which is funny considering it first told me there wouldn’t be this kind of issue.
That’s when I explicitly asked about this and it suggested the ADR 6 about using Netlify serverless functions as a proxy backend. That worked really well.
About Using Claude Code With API Credits
Claude Code will keep going even if you run out of credits during a prompt.
I didn’t find something cut it off at a certain remaining balance… So I had to buy $6 of extra credits to cover the negative $0.57 balance. I hadn’t actived autoreload, because I knew it’d charge me mindlessly…
Second, while searching for a setting to cut it off as soon as credits ran out, I saw this option on https://platform.claude.com:
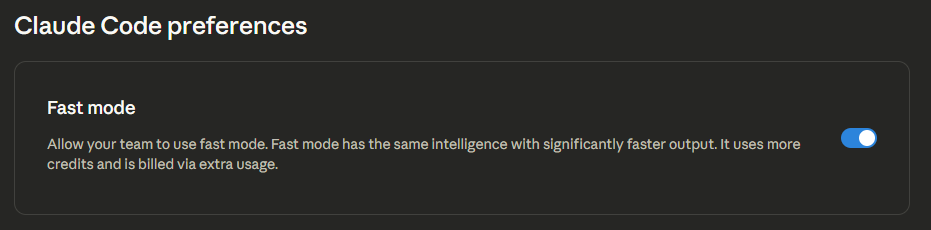
I wonder if my credits ran out more quickly because of this and how much more credits does fast mode really uses… Perhaps that’s where the 30% difference comes from? In the meantime, a Google Search could help us get started with finding out the answer.
From that point on, I switched to Claude Pro subscription.
Using Claude Code With Claude Pro
Even if the application I’m building was small, the 5-hour session window can reach 100% really quickly (for less than 2 hours).
That’s when good management of context is key.
Token Optimization
The Basics
Anytime you use Claude Code, what you provide, whether it’s a text prompt, code files and others, Anthropic counts that as your input tokens. Anything that LLM will reply with or any action it’ll take on your code base goes into the output tokens counter.
And no matter your method of billing, subscription or API credits, we spend tokens. API credits give a clear view of the spent tokens, but subscription limits aren’t so clear.
Even though LLMs are stateless, the entire current conversation is kept “in memory” and each time you prompt Claude Code in your IDE, the entire conversation counts towards your limit…
Tip #1: Clear Command
When you completed a task, use the /clear command to start with a clean slate.
If something in the previous conversation may be useful, then using /compact command can help reduce token usage while keeping relevant context.
Tip #2: Be Precise With Your Scope
Letting Claude Code wander freely in your code base will use tokens faster than you can think.
And sometimes, Claude doesn’t need to read every file each task it works on. If you prepared your tasks into small functional units, independent from one another, then the context for each task will be small.
Similarly, when a bug occurs, investigate it yourself first, narrowing the scope of where the guilty code resides and Claude Code will look into that.
Tip #3: Use the 5-hour Sessions As a Sprint
That’s something that I’ve not applied yet, but it’s something I came aware of in my experience of a multi-agent workflow (that I’ll share in a later article).
A sprint is a backlog of tasks, clearly defined and that a team needs to complete in a certain time span, usually a few weeks. Here, Claude Code has a 5-hour window to use a certain number of tokens and complete the tasks. I’ve experienced that, from a task to another, the available tokens run out smaller or faster without pinning down exactly what did make a difference to go in either direction.
Tip #4: Switch Model Strategically
Opus model is great for planning or deep debugging, but will burn down your token when coding or testing.
Sonnet model will work great to execute the plan.
Tip #5: Use MCP Wisely
MCP can boost the LLM, but sometimes, using too many MCP will bloat your context window.
The idea is to target MCP based on the task and limit which tools the LLM will use for a given task.
That’ll be a topic for a future article.
Conclusion
Claude Code is great. I have built two full applications (including the social sharing app) with it and it runs really well. I’ve already implemented several new features compared to the initial idea.
I feel I can focus on idealization and adding features to my application rather quickly.
I also learned new concepts, like BFS, e.g., Breadth-First Search.
The Pro subscription is enough for me right now, but I’ll soon share, in the next article, that having a team of agents works better to complete tasks.
Stay tuned.
Follow me
Thanks for reading this article. Make sure to follow me on X, subscribe to my Substack publication and bookmark my blog to read more in the future.
Photo by Alex Knight on Pexels.
