
I made a Vue and Supabase boilerplate last year for personal projects. At the same time, I had a client interview where semantic release was, and still is, a big thing.
I knew about conventional commits and semantic versioning. Semantic release is the natural output of those two concepts and best practices.
Brief About Convential Commits
Conventional Commits is a standardized format for writing git commit messages that makes your project history more readable and enables automated tooling. It follows a simple structure: type(scope): description, where the type indicates what kind of change you’re making (like feat for new features, fix for bug fixes, or docs for documentation), the optional scope specifies what part of the code is affected, and the description briefly explains the change.
The main benefit is consistency across your team and project. Instead of random commit messages like “updated stuff” or “fixed things,” you get clear, structured messages like feat(auth): add password reset functionality or fix(api): resolve timeout error in user endpoint. This makes it much easier to understand what changed and why when reviewing the project’s history.
Beyond readability, Conventional Commits enable powerful automation. Tools can automatically generate changelogs, determine version numbers (using semantic versioning), and even trigger different CI/CD workflows based on commit types. For example, a feat commit might trigger a minor version bump, while a fix commit triggers a patch version bump—all without manual intervention.
Brief About Semantic Versioning
Before we dive into the topic of this article, let me introduce Semantic Versioning (SemVer). It is a versioning scheme that uses three numbers separated by dots: MAJOR.MINOR.PATCH (like 2.3.1) to usually define a software version.
Each number has a specific meaning: you increment MAJOR when you make breaking changes that aren’t backward compatible, MINOR when you add new features in a backward-compatible way, and PATCH when you make backward-compatible bug fixes.
This system creates a predictable contract between your project and its users. When someone sees your version jump from 1.5.3 to 2.0.0, they immediately know to expect breaking changes and should review the changelog carefully before updating. A change from 1.5.3 to 1.6.0 signals new features they can safely adopt, while 1.5.3 to 1.5.4 means just bug fixes with minimal risk.
Now, let’s put theory into practice.
Using Semantic Release on GitHub
When I decided to use semantic release last year, I found this great article. Using Perplexity didn’t provide a working solution because it couldn’t find out about the solution Gonzalo Hirsch explained. Thanks for Google search and the search skills you still need in 2026 to find the one article that put you on the right path.
If you follow the steps laid out by Gonzalo, you’ll easily get your repository hooked up with semantic release.
One thing I can add: you find the repository’s secrets under the Settings > Environments > Your Env > Add create new secrets. I’ll explain what we’ll use it for.
Additional comments about release.yml
Regarding the release.yml, here are my comments from what I learned while setting up everything.
environment Key
You need to understand that this provides the workflow with information where it’ll find the secrets. Without it, you’ll get errors, mainly unauthorized errors.
The value to set equals to the name you give to the Environment under your repository’s settings tab.
Generating a Single-use Token
To guarantee the best security, Gonzalo recommends avoiding PAT (Personal Access Token) usage.
This is why we use a GitHub app instead to run the semantic release task. It requires more complex steps, but its security is stronger.
|
|
Within this task, you use the GitHub application ID and its private key. This is what you should have added to the secret variables of your repository environment.
A same GitHub application can have many private keys, for example, if you forget the first private you generated for a first repository, adding a second one later on to another repository works. Only the application ID will remain the same.
About .releaserc
Another point Perplexity failed to mention was to add the repositoryUrl in that file.
I found out about this when I ran the release workflow for the first time.
|
|
See semantic release documentation about the topic.
If you omit it, the semantic release GitHub Actions won’t run successfully.
Full Example Setup
Here is my full setup:
-
I created a GitHub App, as Gonzalo described.
-
I installed it on my account so every repository can use it.
-
I created the environment
CIin my target repositories (URL should behttps://github.com/{your-github-username}/{your-repo-name}/settings) with theGH_APP_IDandGH_APP_KEYenvironment secrets. You get the GitHub application id and the private key under your GitHub application settings. Like I said, you can have multiple private keys for a same GitHub application use a different key per repository. -
I added a release workflow file. It defines the steps of your GitHub Action and uses the
GH_APP_IDandGH_APP_KEYenvironment secrets to generate the token. -
I added the
.releasercfile that the semantic release packages will use to create the versions as you need it. For example, I’ve customized the way I included certain commit types in the release notes. That’s what I’ll explain below. -
I added a
CHANGELOG.mdfile. This is wheresemantic-releasestores the changes made to the code. -
I added a branch rule to protect
mainanddevelopas it’s recommended.- In this step, I added the GitHub application to the ByPass list on the rule. Without that, the workflow will fail to push the tag and
CHANGELOGcommit to the branch.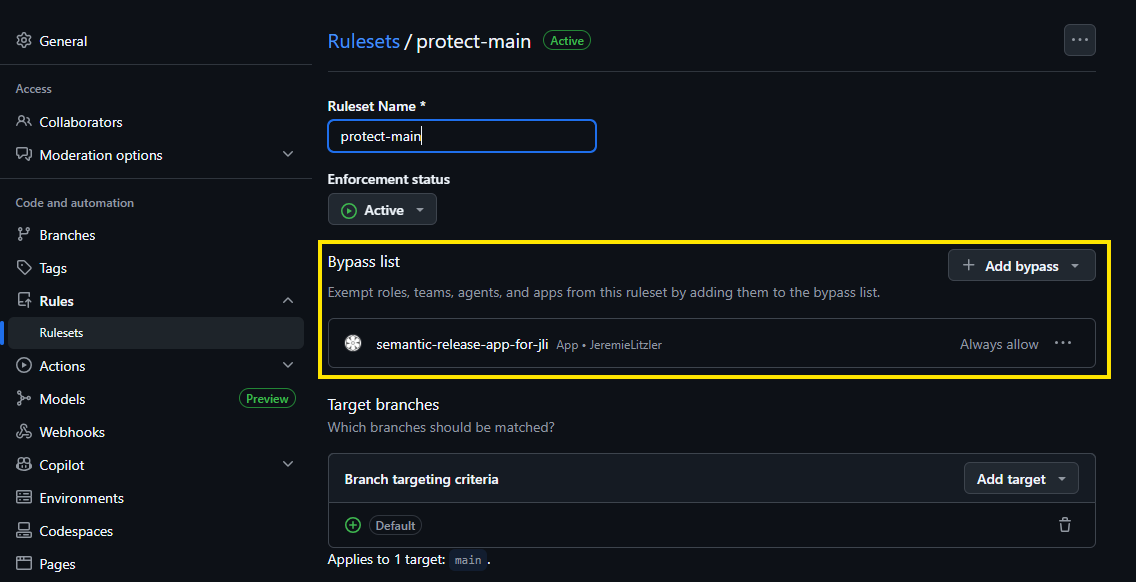
- In this step, I added the GitHub application to the ByPass list on the rule. Without that, the workflow will fail to push the tag and
-
I packaged all code modifications for semantic releases on a CI branch to merge to
mainso I could test it.
Once I validated the PR, the workflow ran, and if the semantic release task evaluates that a new release must be created, then it will.
How Semantic Release Plugin Filters Commits
Note that it won’t create a new release for every commit by default. Unless you have a BREAKING CHANGE, a feat or a fix , commits may not qualify for a new release.
I noticed that fact when I performed my setup to enable semantic release and made commits with the type ci only.
Primary Release Triggers
If the commit message specifies the feat type, semantic release triggers a minor version bump for new features.
If the commit message specifies the fix type, it triggers a patch version bump for bug fixes.
If a ! is found following the type(scope) or the words BREAKING CHANGE in commit messages, it triggers a major version bump.
However, the Convential Commits specifications mention other types, part of the @commitlint/config-conventional package.
Customization Of Release Trigger
But what if I need to trigger a release on dependencies updates or important documentation changes? I found the answer in the semantic release package’s documentation.
|
|
With this example:
- One commit that contains
BREAKING CHANGEorBREAKING CHANGESin their body will be considered breaking changes. - the commits with a
docstype and aREADMEscope will be associated with apatchrelease- For example, the commit could have been:
docs(README): add important detail.
- For example, the commit could have been:
- the commits with a
refactortype will be associated with apatchrelease - the commits with a
styletype will be associated with apatchrelease
Note that you need to install the development dependency conventional-changelog-conventionalcommits to use the conventionalcommits preset.
With this, you also need to update the release-notes-generator and install a new package:
|
|
Now, you could configure the release-notes-generator as follows:
|
|
If you wonder about BREAKING CHANGES section, if one of your commits contains BREAKING CHANGE or BREAKING CHANGES or ! , the release notes will contain the “⚠ BREAKING CHANGES” on top.
About the first release
On a new project, I think that you shouldn’t start with 1.0.0 version since you’re just starting. You should create the first major release when you decide the application is stable enough to do so.
So I thought that adding the following rules to releaseRules configuration wouldn’t follow what it say:
|
|
Above, you prevent any breaking changes or new feature to generate that first major release, until you remove those two rules.
Without them, you revert back to the usual semantic versioning rules, equivalent to:
|
|
But, it didn’t happen when I did that.
Though the semantic release package didn’t find one single The release type for the commit is major, it still defaulted to a major 1.0.0 release as first release with no previous release found.
So, it seems fit to use the tag-release.sh script in this scenario.
I’d recommend to setup the GitHub App, GitHub action and environment when you’ve made that first manual major release.
Then, it’ll follow the releaseRules you set in .releaserc.
I haven’t looked deeper in the configuration that I could tweak to prevent the semantic release step from performing the above behavior.
For now, on the first ever release, I’ll use the tag-release.sh script.
Conclusion
It might feel like a lot, but it saves time when released your software versions and it’ll avoid errors. Now, you can focus on your programming and your commit messages.
I could explain how to set up a “commit message” linter, but that’ll be a topic for another article.
Follow me
Thanks for reading this article. Make sure to follow me on X, subscribe to my Substack publication and bookmark my blog to read more in the future.
Photo by Kanhaiya Sharma
