
Why a Split Keyboard
Since I started the job in Geneva, I had to learn the Swiss French layout on a regular Logitech keyboard. Though it was difficult the first couple of weeks, I can say that I have switched successfully on this layout. I find it more developer-friendly because of the position of the special characters.
A colleague of mine has been using a ZSA Moonlander for a while, a larger model compared to the Voyager with an extra row and I thought it would be interesting to try a split keyboard.
Since ZSA keyboards are very popular, if I can’t get used to the layout, I could sell it back easily in Europe.
I’m mostly interested to see if it could help me position my hands, arms and shoulders to avoid the long-term issues that could occur from a day-long typing job.
Why the Voyager model
My colleague told me that some of the keys he almost never used. Since ZSA Technology Labs sells both Moonlander and Voyager at the same price, I thought I’d be better off using a more restricted keyboard while leveraging the fully configurable features to get the layouts needed for my usual typing habits.
First Configuration
If you’re like me and you use an international layout (French, Swiss, etc.), then read this article from ZSA first. It explains a few points to keep in mind while configuring your layouts.
Once you enabled your internalization and made sure your system is using the matching language, here are the few things to understand:
The Keys Don’t Display The “SHIFT” or “ALT-GR” Character But There Are Present
The key that comes with the Voyager are minimalist. ZSA has printed a single character on each, sometimes a big top dot for neutral keys.
For example, the numeric row on a French Swiss keyboard has special characters available when pressing any shift key.
They’re also available on your ZSA keyboard, by default.
The same is true with “AltGr” or “Right Alt”-enabled characters.
The Reassignment Of a Key Using The Language-specific Code Is Important
For example, when using a French Swiss keyboard, the Z and Y must be swapped.
To do so, you need to assign “Y (fr-CH)” to the usual Z key and “Z (fr-CH)” to the usual Y key.
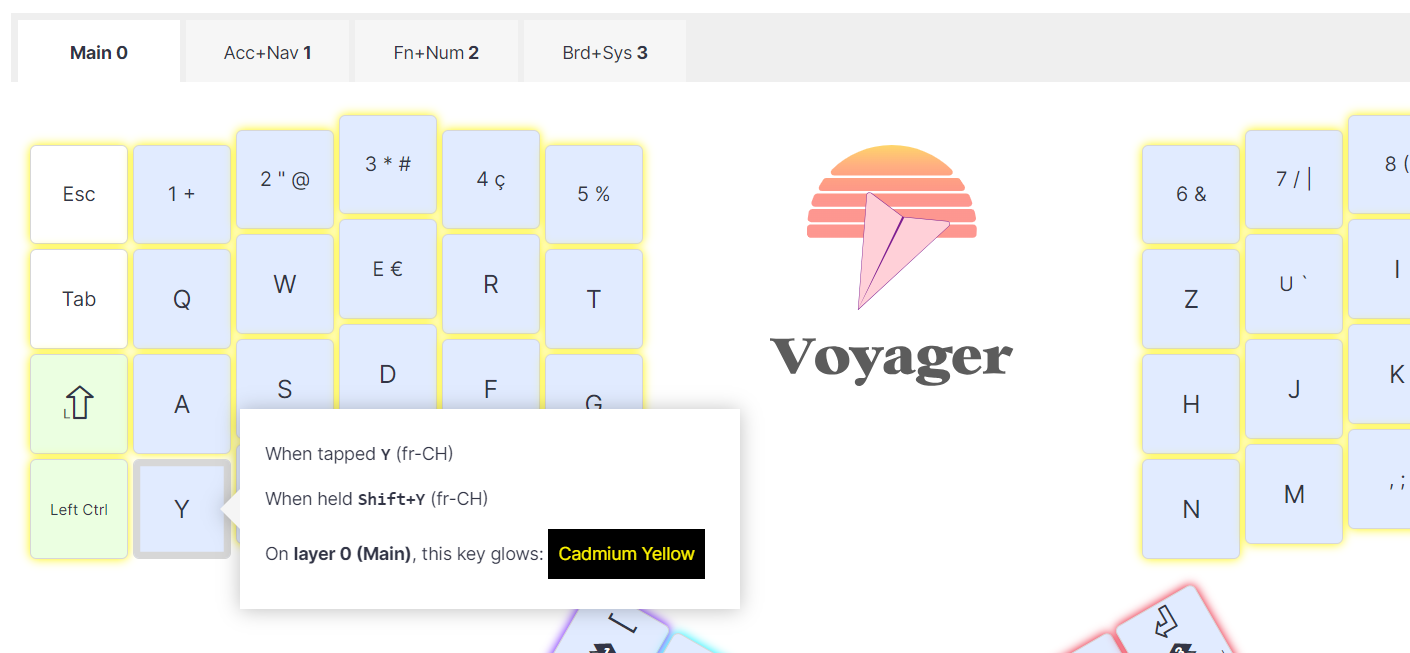
If you use the plain “Y” and “Z” key in the swap, you will get two Y when using the Swiss French system language…
Why is this? Because the code for the “Y” key and “Y (ft-CH)” are different in the Windows system language “French (Swiss)”.
This is true for all other keys that have a “fr-CH” equivalent.
So be mindful about this when you configure your layouts.
Organizing the Layouts
This was the most challenging part because with only 52 keys, you have to think a bit more about how to make it the most efficient for a day-to-day use.
In my case, I write a lot of articles and I code daily for work so how did I combine the two?
First layer
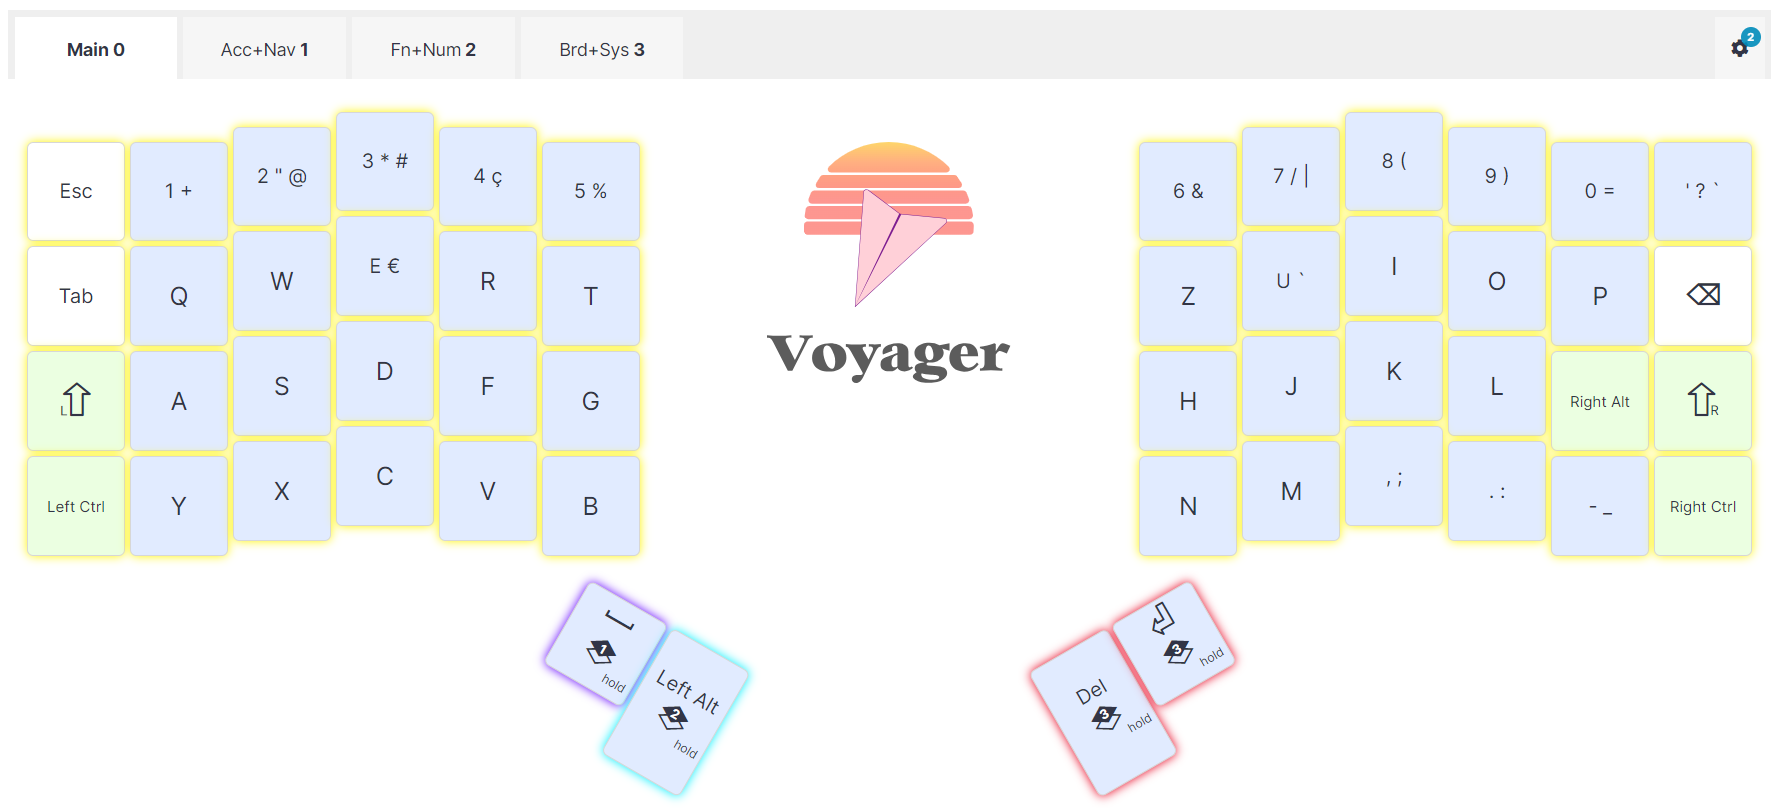
This is the layer for the most common characters and the numerical top row.
I tried to use as much as possible the SHIFT-enabled keys available on the top row.
Also, I left the ALT GR-enabled keys as it works by default.
After a couple weeks of using the keyboard and not performing well in the training area, I noticed that my SHIFT-enabled keys showed a lot of errors. I think it’s due to my lack of flexibility to stretch the pinky finger all the way to any shift key.
From there, I decided to configure all keys on the first layer to output the SHIFT+key character when I held press the key.
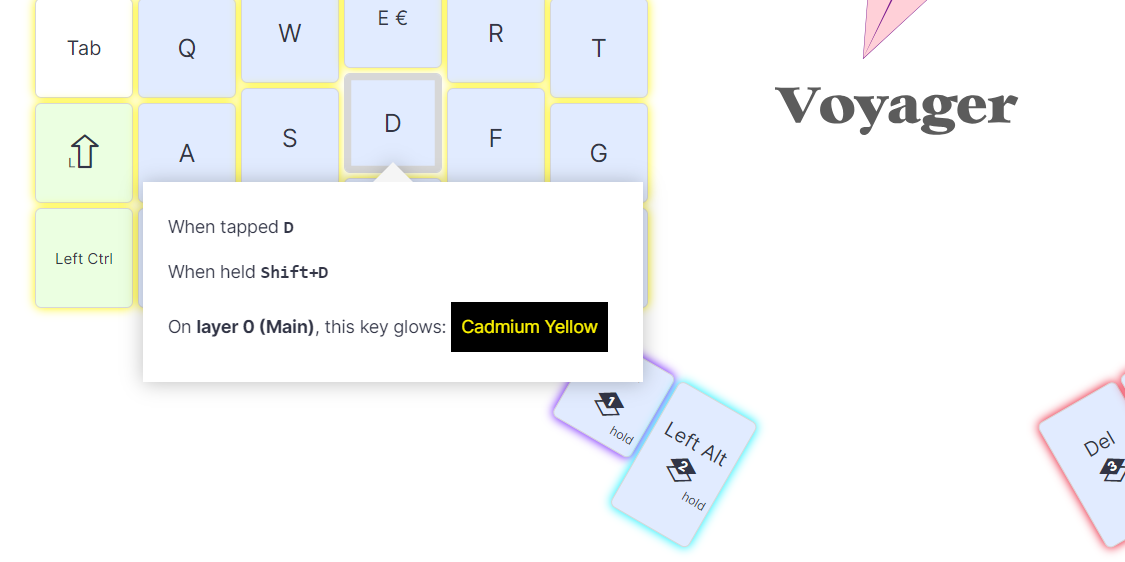
So tapping the A key output “a” and helding on the A key output “A”.
I made the changes on all keys except (circled in red below):
- the 4 four thumb keys,
- the 4 keys of the first column (ESC, TAB, SHIFT LEFT and CTRL LEFT),
- the 3 keys of the last column (BACKSPACE, SHIFT RIGHT, CTRL RIGHT),
- the ATLGR key positioned to the right of the right shift.
With this change, the accuracy of the SHIFT-enabled characters improved a lot and I don’t mind the extra time spend of pressing any key to output the shift character.
Second layer
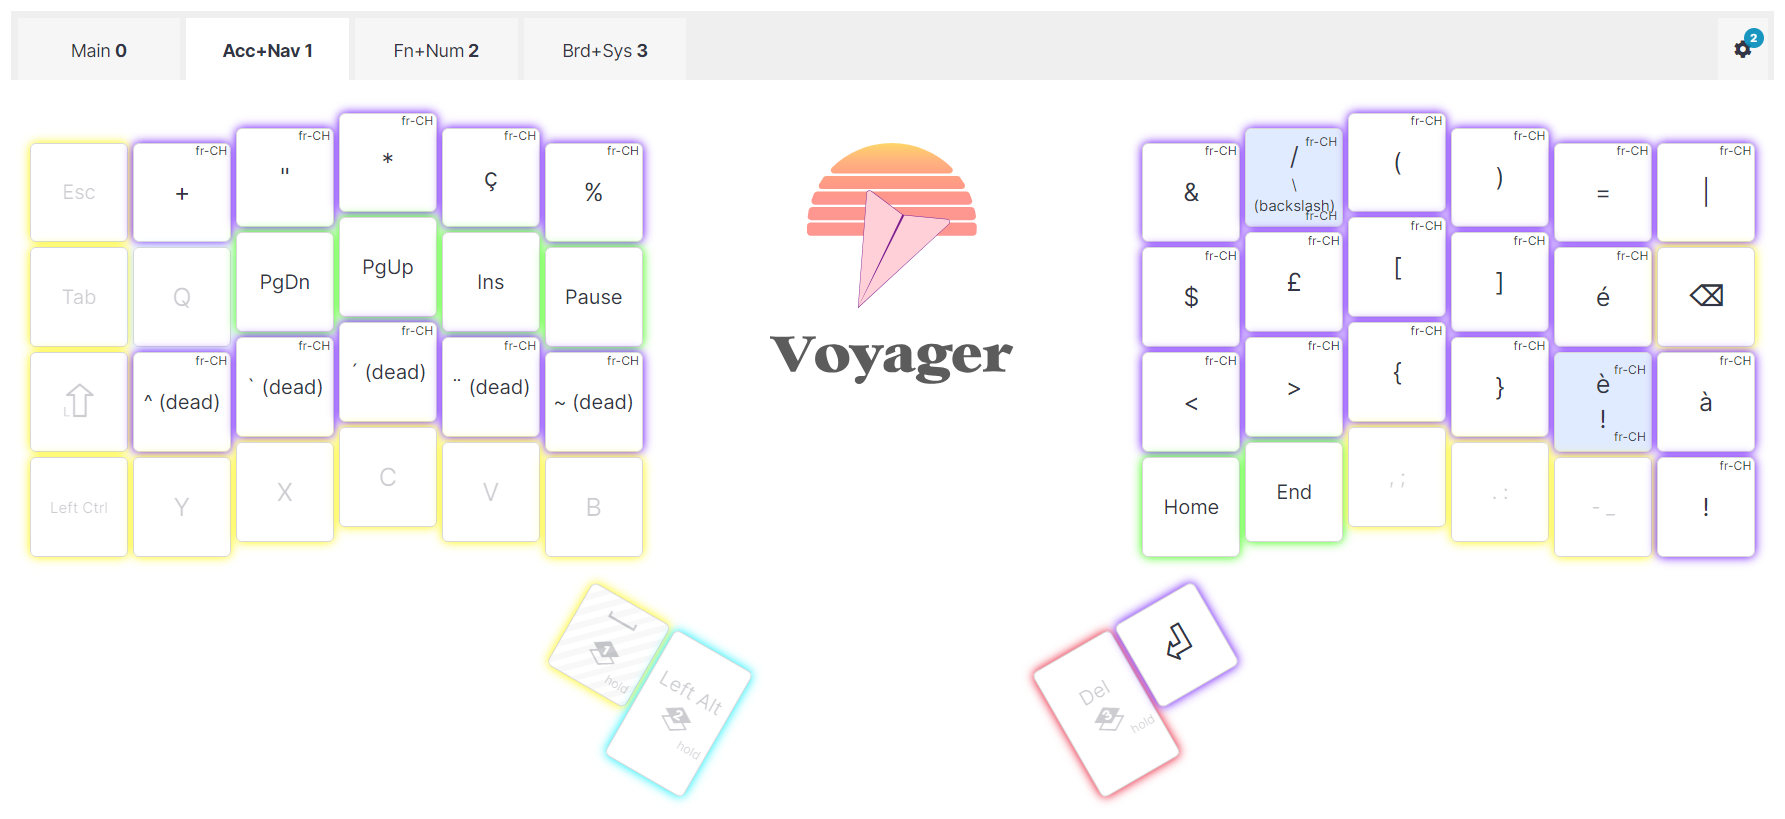
Next, I tackled the next layer: the accents and special characters.
On this layer, I also included the navigation keys that I use a lot: Ins, Home, End, Page Up and Page Down on the left pad with the special accents just below.
The right pad is reserved for the coding characters and the remaining accentuated characters (é, à and è).
The top row allows me to hold press the key to get the usual “SHITF+key” character at this level.
So far, I haven’t trained enough to say if the setup work well. However, the grouped bracket characters helped with coding I get used to the split keyboard… 😛
Third layer
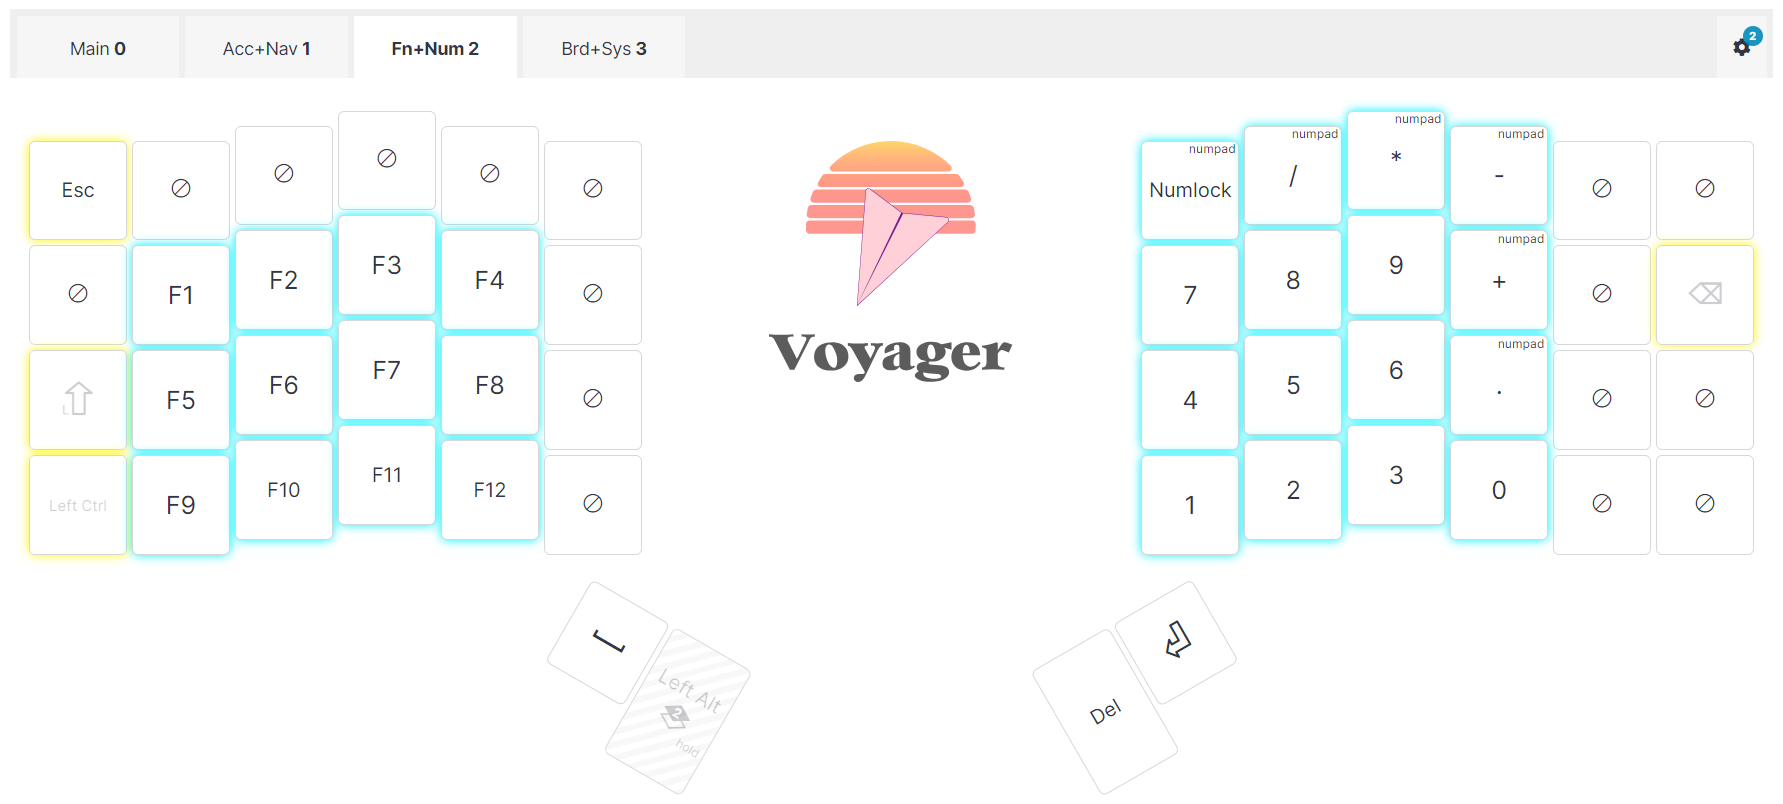
Here, I grouped the function keys on the left pad in rows of four and the numeric pad on the right.
I disabled every key that would have been transparent, e.g., the keys of the first layer would work.
I’m not sure it’s the best setup.
But I left the left CTRL and SHIFT enabled to do combos like CTRL+F5, for example.
Fourth layer
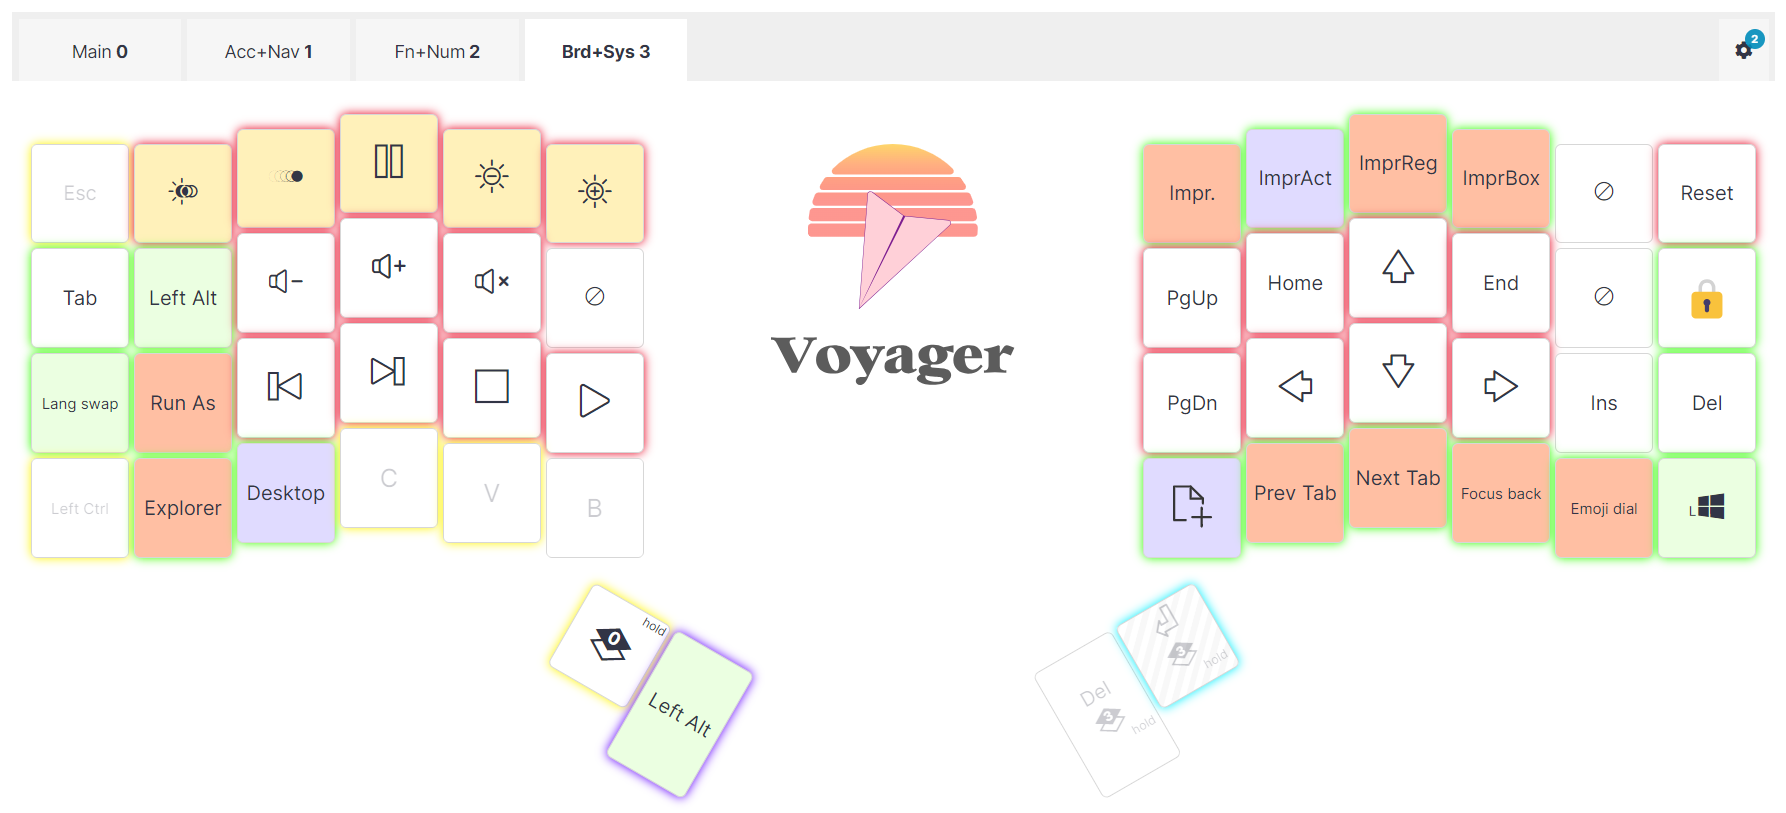
This is the media and macro layer. Though I don’t use a lot of media keys, I use a lot of shortcuts…
Basically, things like:
- Reverse Tab with “SHIFT+TAB” to go back on the focus.
- The language swap with “SHIFT+ALT”.
- The emoji dialog with “WINDOWS+dot character”
- Windows lock with “WINDOWS+L”.
- The navigation in the browser tab with “CTRL+SHIFT+TAB” (previous tab) or “SHIFT+TAB” (next tab).
- The various print screen shortcuts when using PicPick, for example.
- The creation of a new file in Visual Studio Code when using the “advanced-new-file” extension. I use that a ton when coding!
Note: I left the ability to do the standard “CTRL+ATL+SUPPR” (for locking the Windows session) or “CTRL+ALT+INS” (for unlocking the VMWare running on my work station) because the combo key with those keys wasn’t working.
The two right thumb keys therefore enable me to switch temporarily to the layout (as long as I hold the top thumb key) or activates the layer (as I hold the bottom thumb key).
Coloring the layers
The framework I used was to pick 4 colors that are very distinct to see visually the layer I’m in:
- Yellow for the first,
- Purple for the second,
- Blue for the third,
- Rouge for the fourth,
Then I made sure the transparent keys on layers 2 to 4 were the color of the layer 1.
All the macro keys or keys that were different than the theme on a layer used the green color.
That helps a lot I find those on layers 2 and 4.
At the time of writing this, I use the 2 thumb keys on the left and the first thumb key on the right to activate the layer on hold. I use the bottom thumb keys on the right to activate the fourth layer temporarily or fully.
I use the same color as the layer for the layer switch. It helps me to know quickly where the layer I need is.
And finally, all deactivated keys used no color.
Training and first test
ZSA website is awesome and provides the tools to train. It includes training for:
- Prose, starting with Alice in Wonderland
- Book Excerpts
- Numbers & Symbols
- The Whack-a-key mode, which is good for learning special characters.
- Code
- and custom text or free typing
While the prose and book excerpts took me an hour to see progress, the Numbers & Symbols prompted me to rethink my first approach on how I organized the layers.
I’ll spend the next weeks training and use it in real life scenarios to see if I see a difference.
In the meantime, thanks for reading thus far and if you’re interested in my layout, here is the public link.
Thanks for reading.
Credits: the header image is taken from the ZSA website on the ZSA Voyager product page.
